The Zamioculcas zamiifolia, or as most of us call it, the “ZZ Plant,” is a total rockstar in the world of indoor greenery. It’s tough, gorgeous, and—lucky for us—super easy to propagate! If you want to turn your one ZZ plant into a whole jungle, you’ve got a few great ways to do it.
The Different Ways to Propagate Your ZZ Plant
You don’t need a degree in botany to grow new ZZ plants at home. There are three main ways to get the job done, and they’re all pretty high-success:
- Propagating via offsets (baby plants),
- Using leaf or stem cuttings,
- Or simply dividing the plant.
Propagating ZZ Plants via Offsets
Sometimes your ZZ plant does the hard work for you by growing “pups” or offsets. If you spot a little baby plant popping up, you can use it to start a new one! Once the offset is big enough and has developed its own root system, carefully separate it from the mother plant. Pop the little guy into its own pot and find it a warm, bright spot. Just remember to mist it or water it regularly to keep the humidity levels happy while it settles in.
Propagating ZZ Plants via Cuttings
When it comes to cuttings, you can use either a single leaf or an entire stem. The process is pretty similar for both, but there’s one main difference: stem cuttings usually do best starting out in a glass of water, while leaf cuttings can go straight into the dirt. Here’s the game plan:
- Pick out a healthy-looking leaf or a strong stem for your new plant.
- If you’re using a leaf, tuck it into a small pot with some good seed-starting mix. If you’ve got a stem, place it in a glass of fresh, lukewarm water.
- Keep both versions in a warm, bright spot, but keep them out of direct sunlight—you don’t want to fry them!
- Be patient! After a few weeks, you’ll start to see roots forming. Once your stem cutting has a nice root system, you can move it into a pot with soil.
- As soon as your little plantlets look sturdy and have plenty of roots, they’re ready to graduate to their very own permanent pots.
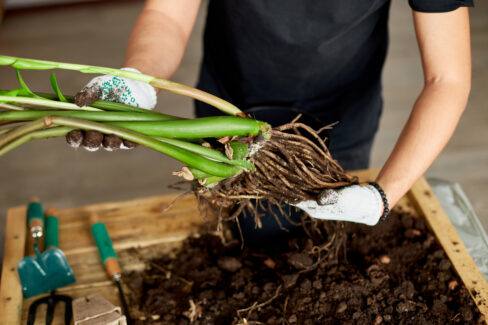
Propagating ZZ Plants by Division
Another foolproof method is division. This is easiest to do when you’re already repotting your plant. Using a sharp, sterilized knife, you can carefully cut the mother plant into several sections. Just make sure every piece you cut has at least one healthy stem attached to it. After that, simply pot up each section individually, and boom—you’ve got multiple ZZ plants!
The Best Time to Propagate
Timing is everything! The best time to propagate your ZZ plant is right before the growing season kicks off, usually in early spring (March or April). At this point, the plant hasn’t put all its energy into new growth yet, so it has plenty of “fuel” left to recover and establish itself. That said, ZZ plants are pretty hardy, so you can technically propagate them year-round. Just make sure to keep those young, vulnerable plants away from chilly drafts and cold temperatures!