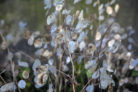
Once you plant a Silver Dollar plant (Lunaria) in your garden, it rarely stays lonely for long! These beauties are famous for being self-sufficient, spreading their seeds far and wide on their own. But if you want to take the reins, you can also propagate them yourself quite easily. Whether you want to control where they grow or share some with a neighbor, here’s how to get more of these shimmering plants in your yard.
The Silver Dollar Plant: A Natural Self-Seeder
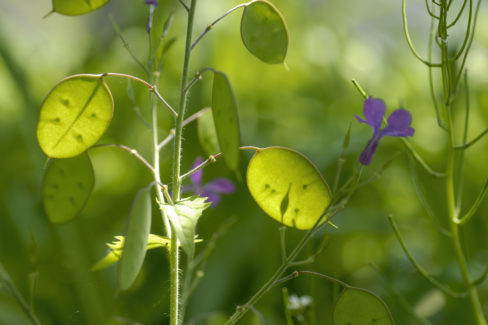
In the wild, the Silver Dollar plant is a pro at multiplying. It’s naturally very prolific and will usually drop its seeds right where it stands. If you’re growing the perennial, hardy varieties, you’ll notice tiny new plantlets popping up around the mother plant every year under the right conditions. The best part? You can simply dig up these little volunteers and transplant them to a new spot in your garden or pot them up to give away.
Taking Control: Methods of Propagation
If you’d rather not leave things to chance, you have two main ways to propagate Silver Dollar plants yourself:
- Growing from seed (the easiest way!)
- Growing from cuttings
Propagating via Seeds
The most common and straightforward way to get more Silver Dollars is through sowing seeds. You can easily harvest the seeds from the dried “pods” of your existing plants once they turn papery and brown, or you can just grab a packet from your local garden center.
If you’re using seeds you collected yourself, the best time to plant them is in the fall. There’s no need to fuss with seed trays indoors; these guys love a direct start in the garden. Just scatter the seeds where you want them to grow and press them lightly into the soil (don’t bury them too deep!). Keep the soil consistently moist, and by next spring, you’ll see those first green sprouts poking through.
Propagating via Cuttings
While seeds are the go-to method, you can also grow Silver Dollar plants from cuttings. To do this, you’ll need to cut a few healthy stems. I recommend taking “tip cuttings” (the very ends of the stems), as these tend to root much more successfully than middle sections.
Place your cuttings in some good quality potting mix in a warm, bright spot. Keep the soil slightly damp, and after a few weeks, they should start developing their own root systems. One quick tip: young plants started from cuttings aren’t quite as tough as established ones. If you’re keeping them outside, make sure to give them a little extra winter protection to shield them from those biting frosts and icy temperatures!