If you’re a plant lover like me, there’s nothing more satisfying than growing your own indoor jungle from scratch. Luckily, the super-decorative Umbrella Tree (or *Schefflera*) is a great candidate for DIY propagation! While you can always buy seeds, propagating from cuttings is a much faster way to get a new plant.
How successful is propagation from cuttings?
Technically, you can take cuttings from the leaves, the tips (tip cuttings), or the woody stems of a Schefflera. However, your success rate will vary depending on which method you choose. Leaf cuttings are pretty tricky and rarely produce new shoots, so I wouldn’t recommend them for beginners. For the best results, stick with stem or tip cuttings. Plus, I’ve found that rooting them in a glass of water is way easier and more reliable than starting them directly in soil or potting mix.
Success rates at a glance:
- Leaf cuttings: Not very practical
- Best options: Tip or stem cuttings
- Most successful: Rooting in water
- A bit trickier: Rooting directly in soil
When is the best time to take cuttings?
You can technically take cuttings from your Umbrella Tree anytime during the growing season. However, you’ll have the best luck in early spring. That’s when the plant is naturally “programmed” to push out new growth. Try to take your cuttings just as you see the first leaf buds starting to swell.
How do I take the cuttings?
The easiest way to get a new plant is by taking tip cuttings. While stem cuttings come from the older, woodier parts of the plant, tip cuttings are taken from the fresh, soft growth at the ends. This is a great way to make use of the trimmings if you’re already giving your plant its annual haircut! Just make sure your Schefflera is healthy and completely free of pests before you start.
Step-by-step propagation guide:
- Choose a healthy, fresh shoot with a leaf node and 1 to 3 leaves.
- Cut about 4 to 6 inches of the tip, making the slice just below a leaf node.
- Cut the base at an angle to increase the surface area.
- Remove the bottom leaves.
- Let the cutting air-dry for about 12 hours.
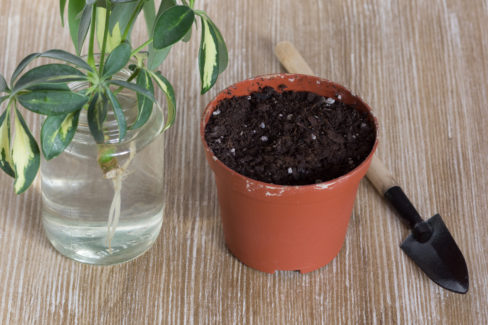
- Place the cutting in a glass of water (make sure no leaves are submerged!).
- Move it to a warm, bright spot with indirect light.
- Be patient! It can take anywhere from 4 to 12 weeks for roots to develop.
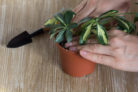
- Once you have a good root system, pot your new baby in humus-rich soil.
Quick tip: Only take cuttings from a healthy, vigorous mother plant. Since the new plants are genetically identical to the original, you want to start with the best “parents” possible!