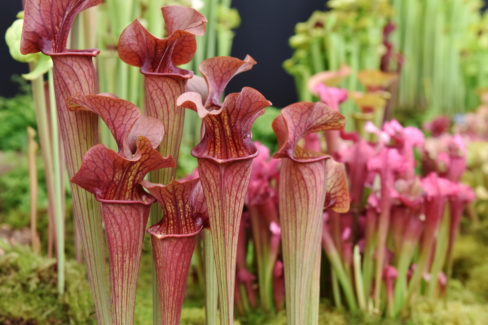
Pitcher plants (Nepenthes) are some of the coolest exotic plants you can add to your collection. Since they’re protected in the wild almost everywhere on the planet, growing your own at home is actually a great way to help take the pressure off natural populations. Just a heads-up, though: growing these beauties from seed requires a serious dose of patience!
All About Pitcher Plant Seeds
Seed pods develop from the male flowers of the pitcher plant, and a single pod can hold up to 500 tiny seeds. If you’re keeping your plants indoors, natural pollination from bees or other insects is pretty much off the table. This means you’ll have to play “the bee” yourself and hand-pollinate the flowers if you want to harvest your own seeds.
An easier trick is to move your pitcher plants out to the balcony or patio during the summer months. Out there, nature has a much better chance of doing the work for you, potentially leaving you with a fresh batch of seeds.
Buying Seeds
The simplest way to get started is to buy seeds from a reputable supplier. Because pitcher plants are protected worldwide, you have to be careful. If you’re buying online, always make sure the seeds come from cultivated plants rather than being poached from the wild.
Sowing Your Seeds
When it comes to starting your seeds, there are a few different substrates that work well, such as:
- Pure peat moss
- Sphagnum moss
- Coco coir
- Or even damp paper towels
Here’s a quick step-by-step guide to getting them started:
- Sprinkle the seeds onto your chosen growing medium. Since the seeds are incredibly tiny and delicate, using a small paintbrush to pick them up and place them can be a lifesaver.
- These seeds need light to germinate, so don’t bury them! Just leave them right on the surface.
- Place your containers in a warm spot and keep them consistently moist.
- To keep the humidity high (which they love), cover the pot with clear plastic wrap. Just remember to lift it for a few minutes every day to let some fresh air in and prevent mold.
Patience is Key
Don’t panic if you don’t see green right away. It can take several months before you see any signs of life. Just stay patient and keep those seeds warm and damp!
Thinning Out the Seedlings
Once they start growing, you’ll want to “prick out” or thin the seedlings. Gently remove the weaker ones so the strongest plants have plenty of room to thrive.
Transplanting Your Young Plants
Once your baby pitcher plants have reached a decent size, you can move them into their own individual pots with the right substrate. Just be extra careful with those tiny roots—they’re very fragile during the move!