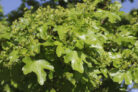
Back in 2015, the Field Maple (Acer campestre) was named “Tree of the Year,” and for good reason! While it looks stunning as a standalone specimen, it’s also an absolute superstar when it comes to hedging. It’s incredibly hardy, easy to shape with a quick trim, and stands up to just about anything nature throws at it. Here is everything you need to know about planting and caring for your own Field Maple hedge.
Planting Your Hedge in the Fall
When you’re ready to start your hedge, you generally have two choices: container-grown plants or bare-root plants. Container plants come with their roots already established in a pot or a burlap ball of soil. You can plant these pretty much year-round—just pop them in the ground, soil and all. The downside? They are significantly more expensive than bare-root options.
If you’re looking to save a chunk of change, bare-root plants are the way to go. However, timing is everything with these guys. You’ll want to get them in the ground between October and April on a day when the soil isn’t frozen. Ideally, aim for the fall. This gives the Field Maple plenty of time to establish its roots before winter sets in. Plus, you’ll have a solid two-week window to keep them well-watered before the first hard frost hits.
Choosing the Perfect Spot
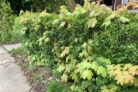
One of the best things about Field Maples is that they aren’t picky. They can thrive in a variety of locations, though they do struggle in deep shade or in spots with constant standing water. If you want to give your hedge the “VIP treatment,” choose a sunny to partially shaded spot with slightly alkaline (limy) soil. Under these conditions, this deciduous beauty will quickly fill out with lush foliage, giving you the privacy and wind protection you’re looking for.
How to Plant Your Hedge
Once you’ve picked your spot, grab some string and mark out the line where your hedge will go. This helps you keep everything straight and ensures your spacing is spot on. For container plants, you’ll want about 12 inches (30 cm) between each plant. Bare-root plants usually need a little more breathing room.
Step-by-Step Planting:
- Place the Field Maple roots in a bucket of water to give them a good soak before planting.
- Dig holes at your marked spots that are roughly twice as wide as the root ball.
- Mix some compost into the excavated soil and loosen the dirt at the bottom of the hole.
- Remove any pots or containers from the plants.
- Carefully place the plants into the holes as planned.
- Fill the holes back up with your soil-and-compost mix.
- Gently tamp down the soil with your foot and give the area a thorough watering.
- Apply a layer of mulch or fallen leaves around the base of the stems.
- Finally, trim the shoots back by about one-third.
That final trim is super important! Keep in mind that when young trees are prepped for sale, they often lose a portion of their root system. By cutting back the top growth, you’re making it easier for the remaining roots to support the plant. Don’t worry about hurting it—Field Maples are incredibly resilient and will bounce back with vigorous new growth in no time.
Caring for Your Field Maple Hedge
While a Field Maple hedge is generally low-maintenance, a little TLC goes a long way. By helping the plants develop strong roots and keeping messy or crossing branches in check, your hedge will stay beautiful for years to come. Here’s the game plan:
If the summer gets particularly dry, make sure to water your hedge regularly. Aim for the base of the trunk and try to water in the morning or evening. It’s also a great idea to fertilize once a year in the spring or fall—simply spread some compost or organic fertilizer around the base.
The most important task, however, is pruning your Field Maple hedge. You’ll notice pretty quickly that these plants grow fast, especially early on. To keep that nice, compact hedge shape, you’ve got to stay on top of the trimming. Grab a pair of sharp, clean shears in the late fall or winter to tidy up the shape and remove any dead wood.