The lemon tree (bot. *Citrus x limon*) doesn’t strictly *need* to be grafted, but it’s a total game-changer if you want to propagate your favorite variety quickly. Just a heads-up: when you’re doing this, keeping your tools clean is priority number one!
Why bother with grafting?
If you decide to grow a lemon tree from a seed, you’re in for a long wait—usually eight to twelve years before you see a single flower or fruit. If you’re like me and don’t want to wait a decade for a homegrown lemonade, grafting is the way to go. It can actually cut the wait time for your first lemon harvest in half!
What you’ll need
To get started, you’ll need a “scion” (that’s a cutting from the specific lemon variety you want to grow) and a “rootstock” (the host plant). For the rootstock, I highly recommend using a Bitter Orange (Poncirus trifoliata). It’s super hardy against frost and has a slow, steady growth habit that works perfectly.
Grab these supplies too:
- A sharp, sterilized knife
- Grafting tape, rubber bands, or raffia
- Grafting wax or tree sealer (like Lac Balsam)
The Step-by-Step Guide
The easiest method for beginners is called “side-veneer grafting.” The best part? The scion and the rootstock don’t have to be the exact same thickness. Aim to do this in the summer when the rootstock is “in sap”—meaning it’s actively growing—which helps the two pieces fuse together much faster.
Step 1: Prep your scion
Here’s how to get your cutting ready:
- Pick a woody branch from last year’s growth that has “sleeping” buds.
- Strip off the leaves, but leave the little leaf stalks (petioles) attached to the stem.
- Make a long, downward diagonal cut toward the base of the scion.
- Make a small “counter-cut” at the bottom to create a little wedge.
- Trim the top of the scion off just above the second bud.
You should end up with a small scion piece featuring one or two healthy buds.
Step 2: Prep the rootstock
Now, let’s get the host plant ready:
- Find a straight section on the trunk or a main branch (about 2 inches long) where you want to attach the scion.
- Clear away any leaves in that area.
- Make a downward cut into the bark that mirrors the size and shape of the cut you made on your scion.
The goal is to create a little “tongue” or flap of bark on the rootstock that the scion can tuck into perfectly.
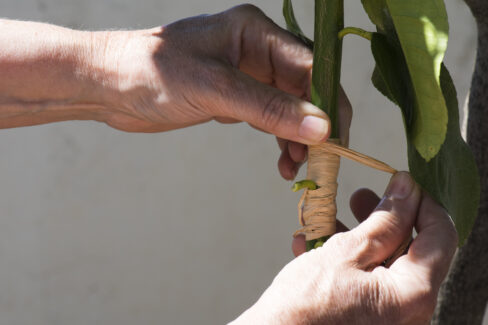
Step 3: Joining them together
- Slide your prepared scion into the flap on the rootstock, making sure the green inner layers (the cambium) of both plants are touching.
- Wrap the connection point tightly with your raffia or grafting tape to keep it secure.
- Seal any exposed cut surfaces with grafting wax or tree sealer to keep it airtight.
If all goes well, the two parts should fuse together in about two to three weeks. Happy gardening!