Philodendrons aren’t just “tree lovers” in the wild; they’re also a gardener’s best friend thanks to how incredibly easy they are to care for. That “easy-going” vibe extends to propagation, too. If you want to expand your indoor jungle without spending a dime, you’re in luck. I’m going to show you the quickest and easiest way to take cuttings from your Philodendron.
Step 1: Cutting and Prepping Your Philodendron Cuttings
When May rolls around and early summer vibes kick in, it’s the perfect time to start propagating. The simplest way to multiply these evergreen exotics is by taking cuttings, and this method works like a charm for almost all climbing Philodendron varieties.
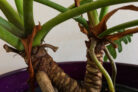
Go ahead and snip off one or more tip cuttings from a healthy vine, aiming for a length of about 4 to 6 inches. You’ll want to strip off any leaves that might end up sitting below the soil line to prevent rot. Just make sure to leave at least one healthy leaf at the very top of each cutting.
Step 2: Potting and Caring for Your New Cuttings
First, grab some small starter pots with drainage holes. For the best results, fill them with a mix of coco coir and lava granulate (or perlite). If you’re working with small-leafed varieties, you can save space by tucking a few cuttings into one pot. However, if you’ve got a large-leafed variety, it’s best to give each cutting its own individual home.
Here’s your game plan for success:
- Moisten the potting mix using soft, filtered, or lime-free water.
- Insert the cutting about halfway or two-thirds of the way into the soil.
- Stick a few wooden skewers or chopsticks into the soil to act as spacers.
- Tent a clear plastic bag over the pot (the sticks keep the plastic from touching the leaves).
- Place your cuttings in a bright spot with indirect sunlight at normal room temperature.
Make sure to “burp” the bag daily to let in fresh air and check that the soil stays lightly moist—just be careful not to overwater, as we want to avoid soggy feet. After about a month, you should see a fresh new leaf popping up. That’s your sign that the roots have taken hold, and you can ditch the plastic bag for good!
Pro Tip: Once those four weeks are up, you can start giving your little plant babies a boost with some liquid fertilizer (diluted to half-strength) every 3 to 4 weeks.
Step 3: Repotting Your Young Philodendron
After about six months, your little cuttings will be mature enough to move into their “forever homes.” At this stage, you can transplant them into a larger pot with nutrient-rich, slightly acidic potting soil. From here on out, you can treat them just like your adult plants and watch them thrive!