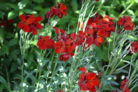
We’ve all been there: you find a gorgeous plant for your backyard, only to realize it’s a total “diva” that requires constant attention. Fortunately, Wallflowers (*Erysimum cheiri*) are the exact opposite. These beauties are tough, low-maintenance, and honestly pretty chill. It’s no surprise that once you have one, you’ll want a whole lot more of them in your garden.
Just Let Nature Do Its Thing
Even though Wallflowers originally hail from Southern Europe, they’ve made themselves right at home here. In fact, they’re so hardy that they often “escape” gardens and pop up in the wild. If you want more plants with zero effort, just let them self-seed. All you have to do is skip the deadheading—leave those faded blooms alone so the seeds can fully ripen and drop naturally.
Sowing Seeds Yourself
If you prefer a bit more control, you can sow seeds you’ve collected or bought from a shop. Just like when you’re planting young Wallflowers, you’ll want to pick a sunny spot with sandy, nutrient-rich soil. Here’s a pro tip: Wallflowers are “dark germinators,” meaning they need total darkness to sprout. Don’t just scatter them on top; cover them with a layer of soil about three times as thick as the seed itself. Keep the soil consistently moist, and you’ll see sprouts in no time.
Propagation via Cuttings
If you don’t want to wait on seeds, taking cuttings is another great way to go. It’s easier than it sounds! Just follow these steps:
- Once the blooming season is over, pick a healthy shoot about 4 inches long.
- Make sure the shoot is green and flexible, not woody.
- Snip it off and trim away the bottom leaves.
- Stick the cutting into a pot filled with fresh seed-starting mix.
- Cover the pot with a clear plastic bag to create a mini greenhouse effect.
- Place it in a warm, bright spot (but out of direct, scorching sun).
- Keep the soil damp, and wait for those new roots to take hold!