First things first, let’s lower the alarm bells: if you’re following the basic rules of growing cress, you probably don’t have much to worry about when it comes to mold. However, sometimes it’s not immediately obvious why those fuzzy patches appear. Today, we’re diving into the “why” behind mold growth and revealing that not everything that *looks* like mold actually is!
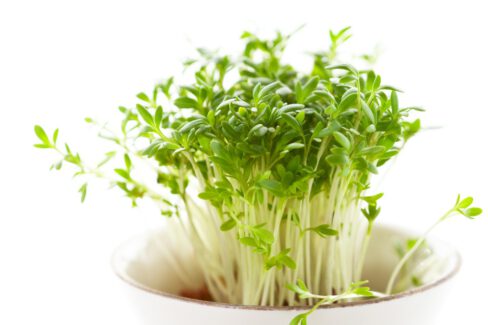
The Cress “Mold Test”
When you see a white coating on your cress sprouts, your first instinct is probably “Yuck, mold!” But there might be a perfectly harmless explanation. Cress grows incredibly fine root hairs that create a dense, fuzzy network. At first glance, these look exactly like mold. Of course, that doesn’t mean actual mold hasn’t joined the party. To be sure, you’ve got to use your nose—it’s the best tool you have.
- A musty, unpleasant smell is a dead giveaway for mold.
- Healthy, fresh cress should smell spicy and peppery.
Toss Moldy Cress Immediately!
If the “sniff test” confirms you’ve got a mold problem, do not harvest it. If you’re on the fence and can’t tell if it’s mold or just roots, play it safe and don’t eat the sprouts! Throw the entire batch—soil and all—into the trash or compost. You might hear advice suggesting you can just scrape off the top layer of soil, but I’d recommend against it. Mold spores are microscopic, making it nearly impossible to get them all. Plus, they often weave through deeper layers of soil that you can’t see with the naked eye.
Is Contaminated Soil the Culprit?
One of the main reasons cress gets moldy is the soil it was planted in. Old, depleted soil or bags that have been sitting open for a long time can be crawling with mold spores. Even a freshly bought bag isn’t a 100% guarantee. Pros usually suggest skipping the “bargain bin” potting soils. If you want to be extra careful, you can actually sterilize your soil before sowing by heating it up in the oven or microwave.
Pro-Tip:
Instead of soil, try using growing mediums that are usually spore-free, like paper towels, tissues, or cotton balls.
Waterlogging: A Recipe for Mold
Cress needs to stay consistently moist, but finding that “Goldilocks” amount of water can be tricky. Many indoor gardeners don’t realize that cress sprouts will mold quickly if they’re sitting in stagnant water. When you water your greens, make sure they never get “wet feet.” Here are a few tricks:
- Water with small amounts more frequently.
- Use a spray bottle to mist them instead of putting them under the faucet.
- Tilt your germination tray slightly so excess water can drain away.
- Sow in a pot with drainage holes and use a saucer.
- Pick a sunny spot with plenty of airflow.
Mold Risks in the Fridge
You can store harvested cress in the fridge for up to seven days by popping it into a plastic bag in the crisper drawer. But even in the cold, mold can still strike—especially if the cress is too damp when it goes in. Always give it a quick sniff before adding it to your sandwich!