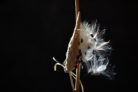
If you’ve already got these unique beauties growing in your garden or in pots, why not try harvesting your own seeds? The seeds are tucked inside pods that look remarkably like little parakeets—which is exactly how the “Parrot Plant” (Milkweed) got its nickname!
Harvesting the Seeds
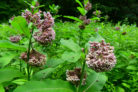
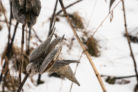
After the summer blooms fade, the fruit begins to ripen in the fall. You’ll see plenty of deep green, oblong pods hanging from the stems that look just like little birds perched on a branch. Once they’re fully ripe, they’ll pop open, releasing seeds attached to silky white threads that catch the wind. If you let nature take its course, you’ll likely find new sprouts popping up all over your garden next spring. Of course, you can also collect them yourself for a more controlled planting.
Before you get started, I highly recommend “stratifying” your seeds. Just pop them in the fridge for about a week. This cold snap mimics winter and helps break the seed’s natural dormancy, signaling that it’s time to grow. While some gardeners skip this step, nature does it every winter outdoors, so a little chill time definitely doesn’t hurt!
A quick heads-up: You might have trouble finding these seeds or starts at your local garden center. In many areas, they’re considered an invasive species because they spread so aggressively via seeds and underground runners, which can crowd out native plants.
How to Sow Your Seeds
The great thing is that you can start these seeds indoors any time of year. Here’s my step-by-step guide:
- Fill your favorite seed trays or small pots with a high-quality seed-starting mix.
- Place two seeds per spot, about 1.5 inches apart.
- Barely cover them with a dusting of soil—these guys are “light germinators” and need a bit of sunshine to wake up.
- Give them a gentle misting or watering; you don’t want to wash the seeds away!
- Find a bright, warm spot for your trays (aim for 60-70°F).
- Pro tip: Cover the tray with a plastic bag to create a mini-greenhouse, but make sure to vent it occasionally so they can breathe.
You should see sprouts appearing in about three to four weeks. Once they’ve developed their fourth leaf, they’re ready to be thinned out or moved to their own space.
Caring for Your New Plants
Once they’re big enough, repot your seedlings into individual containers and keep them in a bright spot. After about six months, they’ll be sturdy enough to move into the garden or a large outdoor planter. Even though these plants are generally hardy in our climate, the “youngsters” need a little extra TLC during their first winter. If they’re in the ground, mulch the roots well with brush or dry leaves. If they’re in pots, it’s best to move them into a frost-free area until spring.