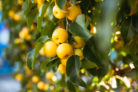
Thinking about adding a pear tree to your backyard? That’s a fantastic idea! There’s nothing quite like biting into a sun-ripened pear straight from your own garden. But before you grab your shovel, there are a few things you should know to make sure your tree thrives. The size of your yard will really dictate what kind of tree you should get. Let’s walk through the how, when, and where of planting your new pear tree.
The Best Time to Plant
When you go to the nursery, you’ll usually find trees in two forms: bare-root or container-grown. As the name suggests, bare-root trees come with their roots exposed—no soil attached. Container-grown trees, on the other hand, have been raised in a pot. This difference actually changes when you should plant them.
You can buy and plant potted trees pretty much year-round. Just keep in mind that if you plant during the heat of summer, you’ll need to be a “water warrior,” giving your new tree a good soak at least once a week (or more if it’s really scorching).
Bare-root trees are usually only available in the spring and fall. These are actually the best seasons for getting a tree established. I personally love planting in October or November. Planting in the fall gives the tree a chance to settle its roots into the soil before winter hits, taking advantage of the natural seasonal rainfall.
What Pears Need to Thrive
Pears can be a little picky about their “feet.” They love soil that is deep, well-draining, and rich in organic matter. If you plant a pear tree in a spot that stays too soggy, the fruit might end up tasting a bit bland. Plus, wet feet make trees much more susceptible to diseases and pests .
Picking the Perfect Spot
Pear trees are total sun-seekers! To get the sweetest fruit, give them a spot with plenty of sunshine. A south-facing wall is like a luxury spa for a pear tree—it stays nice and warm. You’ll also want to make sure the spot isn’t too windy. Those chilly winter gusts can be really tough on them.
Choosing the Right Tree for Your Space
Standard and Semi-Dwarf Trees
These beauties can easily reach 30 feet tall. Unless you have a massive backyard or a meadow, these might be a bit much for a standard suburban lot.
Spindle and Bush Forms
If you have a smaller yard (around 4,000 square feet or less), these are your best bet. They stay much more manageable and look amazing grown against a wall as espalier fruit . You can even grow these varieties in large pots or containers on a patio!
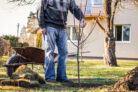
Step-by-Step Planting Guide
- First, get your gear ready. You’ll need a spade, a shovel, a sturdy support stake, some jute twine, a mallet, and, of course, your tree.
- Dig a hole that is twice as wide and twice as deep as the root ball.
- If your soil is heavy clay, mix some sand into the dirt you dug out. Regardless of your soil type, it’s always a good idea to mix in some compost or organic fertilizer to give the tree a head start.
- If you’re planting a larger tree, now is the time to drive your support stake into the ground on the windward (usually west) side of the hole.
- Fill the hole about halfway back up with your soil mix and set the tree on top.
- Pro tip: If you have gophers or voles in your area, place the root ball in a wire basket or wrap the roots in fine mesh to protect them from hungry critters.
- Fill in the rest of the soil around the roots. If you’re planting a bare-root tree, give it a gentle shake as you go to help the soil settle into all the nooks and crannies between the roots.
- Tamp the soil down firmly with your foot to remove air pockets and give it a very thorough watering (we call this “mudding it in”). Finally, loosely tie the trunk to the stake.
- Crucial Step: Make sure the graft union (that bumpy scar near the base of the trunk) is well above the soil line.
Quick Tip: If the root ball looks really dry before you plant, let it soak in a bucket of water for about 30 minutes. Also, take a pair of shears and snip off any damaged or broken roots before the tree goes in the ground.