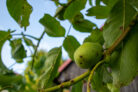
Pears are surprisingly easy to graft, and they usually take to their new host quite well. If you’ve been thinking about trying your hand at it, you’re in the right place! Let’s dive into the different ways to graft these trees and some cool facts you should know before you start.
When it comes to pears, we usually talk about two main types of rootstocks. Think of the rootstock as the “engine” of the tree—it determines how big it gets and how it grows.
- Quince rootstock
- Seedling rootstock
The Quince Rootstock
If you don’t want a pear tree that towers over your entire house, quince rootstock is the way to go. Quince grows shallow roots , which naturally limits the tree’s size because it can’t soak up as much nutrients as a massive root system would. This results in a medium-to-small tree that starts producing fruit pretty early in its life. Just keep in mind that because the roots are shallow, these trees aren’t quite as sturdy in high winds as their deep-rooted cousins.
The Seedling Rootstock
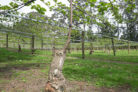
For these, we usually use a pear seedling (often the “Kirchensaller” variety). Since wild pears naturally grow deep taproots, these trees get big—I’m talking classic semi-standard and standard sizes. You’ll have to wait a few more years for your first harvest, but once it starts, the yield is usually massive!
Whip Grafting (Copulation)
For this method, you’ll want to plan ahead and harvest your “scions” (the twigs you want to grow) in the winter. Look for one-year-old branches about 4 to 8 inches long with at least three buds. Keep them cool and moist until April, which is the prime time for grafting.
Here’s a quick step-by-step:
- Make a long, slanted cut on a branch of your host pear tree.
- Make an identical slanted cut on your scion wood.
- Press the two cut surfaces together so they line up perfectly.
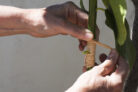
- Wrap the joint tightly with grafting tape, raffia, or crepe paper.
T-Budding (Okulation)
You can also graft in the heat of summer, usually around July or August. This is called “budding.” For this one, you’ll cut your scion wood right before you plan to use it.
Here’s how you do it:
- Trim the leaves off the scion, but leave a tiny bit of the leaf stem (the “stub”) attached.
- Look for the small, dormant bud at the base of that stem. Carefully slice that bud off the branch, taking just the bark with it.
- Pro tip: Make sure there’s no wood attached to the back of the bud—just the thin layer of bark.
- On your host tree, find a smooth spot of bark and make a cut in the shape of a “T” (one horizontal, one vertical).
- Gently peel back the edges of the “T,” slide your bud inside, and wrap it up tight with raffia.
- After about 6 weeks, you’ll know it worked if the little leaf stub falls off and the bud looks plump and healthy.
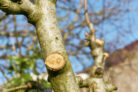
- About a year later, you can prune away the original branch just above your new graft.
Quick Tip: Always keep things clean! Try not to touch the cut surfaces with your fingers. Oils and bacteria from your skin can cause infections, and we want that graft to be a success!