Orchids have become some of the most beloved houseplants out there, and for good reason! But instead of constantly hitting up the garden center for new ones, did you know you can actually propagate the orchids you already have at home? There are a few different ways to do this, and today I’m going to walk you through the best methods to expand your collection.
Different Propagation Methods
When it comes to making more orchids, there isn’t a one-size-fits-all approach. Depending on the specific type of orchid you have and its natural growth habits, you generally have four options:
- Using offshoots (keikis)
- Taking cuttings
- Dividing the plant
- Growing from seed
Vegetative Propagation
Using offshoots, cuttings, or division are what we call “vegetative” methods. In plain English? It’s asexual reproduction. The cool thing about this is that the new baby plants will be genetic clones of the mother plant. That means you’ll get the exact same flower colors and shapes you already love!
Propagating Orchids via Offshoots
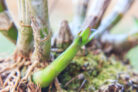
Some orchids are real “procreators” and love to grow little babies called “keikis” (the Hawaiian word for baby). You’ll see this most often with Phalaenopsis, Dendrobium, Calanthe, and Epidendrum. These little offshoots pop up either on the bulbs or right on the flower spike. If you notice tiny green leaves and roots growing in weird spots, congrats—you’ve got a keiki!
Keep taking care of your orchid as usual, but leave the keiki attached for a while. It needs to hitch a ride on the mother plant to get the nutrients it needs to grow. Wait until it has at least two or three leaves and roots that are about one to two inches long before you think about moving it.
Once it’s ready, carefully snip it off and pot it up in a small container with fine orchid substrate. Treat these young plants like the adults, but pay extra attention to keeping the humidity high and staying on top of your fertilizing routine.
Propagating via Cuttings
Another way to go is taking cuttings, which works great for orchids like Vanda or Angraecum. You’ll want to take a “top cutting”—aim for one about 15 inches long that isn’t currently blooming. Strip the leaves off the bottom half of the stem.
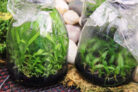
Place your cutting into a pot with good orchid mix and cover it with a clear plastic bag to create a mini-greenhouse effect (this keeps the humidity high). Keep it in a warm, bright spot—ideally between 77°F and 82°F. Once you see new roots and shoots forming after a few weeks, and the plant feels sturdy, you can move it to its permanent home.
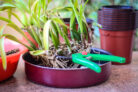
Propagating by Division
If you have orchids like Cymbidium, Oncidium, or Brassia, dividing the root ball is often the easiest route. Take the plant out of its pot and gently shake off the old substrate. Using a sterilized knife or garden shears, cut the root ball into sections. Just make sure every piece has at least three “bulbs” (pseudobulbs) attached so it has enough energy to regrow.
Pop each section into its own pot and keep caring for them as you normally would.
Growing Orchids from Seed
Then there’s the “generative” method: growing from seed. I’ll be honest with you—this isn’t for every orchid type, and it requires a ton of patience and a little bit of luck!
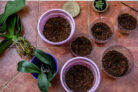
The Right Growing Medium
Orchid seeds are tiny and don’t have their own food stores to help them sprout. In nature, they rely on a special fungus to survive. To do this at home, you’ll need a special nutrient agar (growing medium), which you can buy or try to mix yourself.
Pollination
Before you get seeds, you need pollination. Since most of us keep orchids as houseplants (where there aren’t many bees flying around!), you’ll have to do the pollinating by hand.
Sowing the Seeds
Once you have seeds, they need to be sterilized with hydrogen peroxide. Then, place them in a test tube or flask with your nutrient medium and seal it tight. Keep them in a bright, warm spot around 77°F.
Alternatively, some hobbyists try scattering the seeds directly onto the root area of the mother plant. If the right fungus is already living in the soil, you might just get lucky and see sprouts!
The Young Plants
If everything goes right, you’ll see signs of life in a few weeks. Keep those tiny seedlings warm and moist until they’re big enough to pot individually. Just a heads-up: growing from seed is a long game. It can take anywhere from 5 to 15 years before you see the first bloom!
Cleanliness is Key
Whether you’re mixing your growing medium or sowing seeds, you have to be a “clean freak.” Sterilize your tools and workspace constantly. Even a tiny bit of bacteria or mold can ruin the nutrient medium and kill off your seeds before they even have a chance.