Ever wanted to expand your orchid collection without spending a fortune at the nursery? You’re in luck! These exotic beauties can actually be propagated in a few different ways. The most popular method is using “offshoots,” which basically gives you a genetic twin of your original plant. Here’s the lowdown on how to grow your own orchid babies.
Propagating Orchids via Offshoots
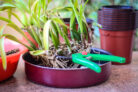
The easiest and most successful way to handle orchid propagation is by using offshoots. Most orchid species will naturally produce these little clones during their lifetime as a way to keep their lineage going. Interestingly, you’ll often see sick or older orchids producing offshoots as a “last hurrah” to ensure the plant’s survival before it passes on.
Different Types of Orchid Offshoots
Depending on the specific type of orchid you have, these offshoots can show up in a few different forms:
- Keikis (baby plants)
- Cuttings
- Layers (runners)
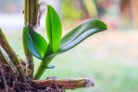
Orchid Keikis
Some orchids love to produce what we call “keikis” (the Hawaiian word for “baby”). These are tiny plantlets that pop up either on the bulb or along a flower spike where you’d normally expect a bud.
Pro tip: Don’t rush to cut them off! If the keiki doesn’t have leaves or roots yet, it still needs the mother plant to provide nutrients. To encourage them along, give the keikis a regular misting with lukewarm water to stimulate root growth. Once the keiki has at least two or three green leaves and a few aerial roots about an inch or two long, you can carefully snip it off and move it to its own pot.
Since they’re still pint-sized, use a smaller pot and break down any large chunks of orchid bark into smaller pieces. Adding some damp sphagnum moss can really speed up growth. Keep the humidity high by misting your new “teenager” frequently.
You’ll most commonly see keikis on:
- The classic Phalaenopsis (Moth Orchid)
- Dendrobium
- Epidendrum
- Calanthe
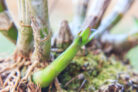
Orchid Cuttings
Cuttings are another great way to go, especially for climbing varieties like Vanda or Angraecum. Monopodial orchids (those that grow upward from a single stem) often produce rooted sections along the main axis. Look for a healthy top shoot that isn’t flowering and is about 15 inches long. Use a clean, sterilized knife to make the cut.
Pop the cutting into a pot with orchid-appropriate seedling mix and keep it slightly damp. To create a mini-greenhouse effect, you can place a clear plastic bag over the pot—just remember to air it out daily so you don’t get any mold.
Keep it in a warm, bright spot (around 77–82°F), and you should see new growth within a few weeks. Once it’s established, it’s ready for its permanent home.
Orchid Layers
If you have an orchid that grows long runners, “layering” is a fantastic technique. Here’s how you do it:
1. Find a young, flexible shoot that isn’t flowering and is long enough to reach the ground (or a neighboring pot).
2. Gently press a section of the stem into moist seedling soil, burying it about an inch deep. You can use a small clip to keep it in place.
After a few weeks of consistent watering, the stem will develop its own roots. Once the new plant looks strong enough with its own leaves and roots, snip the “umbilical cord” connecting it to the mother plant. Use a clean knife and dab the cut with a little cinnamon or charcoal powder—it’s a natural way to prevent infections!
Caring for Your Young Orchids
No matter which method you used to get your young orchids, the aftercare is pretty much the same. These little guys need a bit of extra TLC to grow into showstoppers.
First, pick the right location. They need plenty of light and consistently warm temperatures. Since they don’t have many roots yet, a regular fertilizing routine will help them get established.
When it comes to watering, don’t just pour water over them. Instead, dunk the entire inner pot into lukewarm, filtered water. Wait until the air bubbles stop rising (meaning the roots are fully hydrated), then let the excess water drain away completely. Don’t forget to mist the leaves and aerial roots to keep that humidity high!
As your little orchid hits its growth spurt, you can eventually repot it into a larger container. Happy growing!