There are a few different ways to propagate orchids, but if you’re looking for a real gardening challenge, growing them from seed is the way to go. Unlike simpler vegetative methods, starting from scratch requires a bit of “mad scientist” energy—starting with manual pollination to get those elusive seeds in the first place.
What You’ll Need
To get started with orchid seeding, you’re going to need a mini-lab setup. Here’s your checklist:
- A large cooking pot
- An alcohol burner
- A wire cooling rack
- Several small jars with lids
- A handful of test tubes
- Tweezers
- An inoculation loop
- Aluminum foil
- A stapler
- A sharp knife or scalpel
- Coffee filters and cotton pads
- Gloves
- Distilled water, ethanol, and hydrogen peroxide
Pollination: Playing the Part of the Bee
In the wild, orchids rely on insects or birds for pollination. Since our indoor orchids aren’t exactly visited by hummingbirds in the living room, nature needs a helping hand. To get seeds, you’ll have to pollinate the orchid manually yourself.
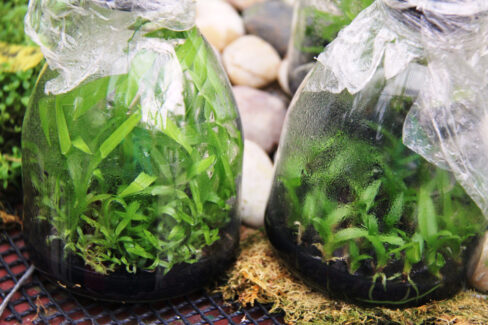
The Secret Sauce: Nutrient Medium
Orchid seeds are unique because they don’t carry their own food supply (endosperm). In the wild, they survive by forming a symbiotic relationship with a specific fungus. To mimic this at home, you’ll need a specialized nutrient medium (often called agar). You can buy this premixed at specialty shops or try whipping up your own.
Harvesting the Seed Pods
If your pollination was a success, a seed pod will begin to form. You’ll know the seeds are ready when the pod splits open on its own. Carefully snip off the open pods and spread the seeds onto a coffee filter. Fold the filter over and staple the edges to create a little secure envelope.
Sterilizing the Seeds
This is where things get technical. You need to sterilize the seeds to prevent mold. Place your wire rack over a pot of boiling water to create a sterile steam zone. Fill a small jar with about half an inch of hydrogen peroxide, drop your seed-filled coffee filter “envelope” in, and let it soak for about ten minutes.
Sowing the Seeds
Next, soak a cotton pad in ethanol and place it on the rack over the steam, along with a jar of distilled water. Move the coffee filter from the peroxide into the distilled water to rinse it, then set it on the ethanol-soaked pad and carefully open the paper.
Fill your test tubes with the prepared nutrient medium. Using your inoculation loop, carefully transfer the seeds into the tubes. Seal the tubes with a stopper and wrap the tops with aluminum foil, securing them with a rubber band for extra protection.
Cleanliness is Everything
I can’t stress this enough: sterility is the name of the game here. You need to disinfect every tool and jar constantly throughout the process. Even a tiny bit of bacteria or fungus getting into that nutrient medium can ruin the whole batch and stop germination in its tracks.
The Perfect Spot for Seedlings
Find a bright, warm spot for your sealed test tubes—ideally around 77°F (25°C). If everything went according to plan, you’ll see the first tiny green sprouts appearing over the next few weeks. Once they’re strong enough, you can transition them into their own individual pots and start treating them like the beautiful orchids they’re destined to be!