The Rubber Tree (botanical name *Ficus elastica*) isn’t just one of the easiest houseplants to care for—it’s also incredibly easy to propagate! Whether you want to fill your home with greenery or have a thoughtful, homegrown gift for a friend, growing new rubber trees is a total breeze.
Propagation Methods
Technically, there are three ways to propagate a rubber tree:
- Seeds
- Air layering
- Cuttings
However, growing them from seeds isn’t really an option for indoor gardeners. Since rubber trees rarely bloom when kept in pots, you won’t find seeds on your plant.
Air Layering
Air layering is a fantastic way to turn one plant into two. The best part? You end up with a decent-sized young tree with several leaves right from the start. The only catch is that it requires a bit of patience.
Here’s how to master the air layering technique:
- Pick out a healthy branch.
- Make an upward diagonal cut on a semi-woody branch, just below a leaf.
- Slice about an inch or two upward into the stem.
- To keep the slit open, tuck a small wooden wedge or a matchstick inside.
- Wrap the cut area with a generous amount of soaking wet moss.
- Wrap clear plastic wrap around the moss “bundle.”
- Secure the plastic at both ends with some twine or string.
After a few months, you’ll see plenty of roots growing inside the bundle. Once that happens, cut the branch just below the root ball. Carefully remove the plastic and plant your brand-new rubber tree in a pot with fresh potting soil.
Cuttings
Propagating with cuttings is generally considered the easier route. Just keep in mind that you’re starting with a tiny “baby” plant, so it’ll take some time before it grows into a tall, stately tree.
Getting Your Cuttings
When it comes to cuttings, you have two choices:
- Tip cuttings (taken from the soft, new growth at the top)
- Node cuttings (taken from the woodier stems of older plants)
No matter which you choose, always make sure you’re cutting from healthy, vigorous stems.
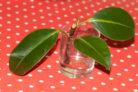
Tip Cuttings
To propagate using tip cuttings, follow these simple steps:
- Cut a 4 to 6-inch piece from the top of a branch, making the cut just above a leaf.
- Remove all the leaves except for the very top one.
- Place the cutting in a glass filled halfway with lukewarm water.
- Set it in a bright spot where the temperature stays around 77°F (25°C).
- Change the water every two to three days to keep it fresh.
Once you see roots developing after a few weeks, you can move your cutting into a pot with soil.
Alternatively, you can skip the water and put the tip cutting directly into seed-starting soil. If you go that route, just follow the same steps as you would for a node cutting.
Node Cuttings
To take a node cutting, look for a section of the stem with a “dormant bud” (a little bump where a new leaf would grow). The cutting only needs to be about an inch or two long. Remove any leaves before planting the node cutting into a pot of seed-starting mix. Then, follow these steps:
- Moisten the soil.
- Cover the cutting with a clear glass jar or a plastic dome to create a mini-greenhouse.
- Place it in a bright, warm spot (ideally around 77°F).
- Lift the cover regularly to mist the soil and let in some fresh air.
Once you see new growth sprouting, you can ditch the cover and start treating your new arrival like a regular rubber tree!