For many gardeners, pruning hydrangeas feels like trying to solve a complex puzzle. But honestly, once you know a few basic rules, it’s a total breeze! You can prune your hydrangeas for different reasons throughout the year, as long as you keep the variety in mind.
Understanding the Two Pruning Groups
Hydrangeas come in many shapes and sizes, and they aren’t all treated the same. Some varieties bloom on “new wood” (fresh growth from the current season), while others set their buds on “old wood” (stems from the previous year). If you give an “old wood” variety a radical haircut, you’ll likely be waiting a long time to see any flowers. On the other hand, pruning “new wood” varieties can actually encourage them to produce even bigger, better blooms.
Here’s how the most common types are grouped:
- Group 1: Bigleaf (Mophead/Lacecap), Oakleaf, Climbing, and Mountain Hydrangeas.
- Group 2: Panicle (PeeGee) and Smooth (Annabelle) Hydrangeas.
For Group 1, the foundation for next year’s flowers is laid down in the previous summer or fall. Because of this, you should avoid heavy pruning, or you’ll accidentally cut off all your flower buds! Instead, just do some light maintenance during the blooming season. Group 2 hydrangeas, however, are much more forgiving. You can prune these back hard—and in many cases, you should! A notable exception is the Endless Summer variety. While it’s technically a Bigleaf hydrangea, it’s a “rebloomer” that can actually handle a heavier prune and still flower beautifully.
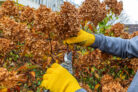
Spring Pruning Tips
When February or March rolls around, it’s time to grab your tools for a little shaping. Use a sharp pair of bypass pruners or rose shears. If your hydrangea has turned into a massive bush, telescopic loppers can be a lifesaver. Whatever tool you choose, make sure the blade is sharp and clean. This ensures a smooth cut and prevents diseases from entering the “wound.”
First, double-check which group your plant belongs to. If it’s in Group 1, be gentle. Only remove stems that are frost-damaged or completely dried out. You can also trim back any “rogue” branches that are growing at odd angles and crowding the center. Otherwise, leave the main stems alone. If the bush is getting too dense, you can thin it out a bit to improve airflow. This is also a great time to take cuttings for propagation!
For Group 2 hydrangeas, feel free to be much more aggressive. You can shape the shrub or even cut it back to about 8 to 12 inches above the ground. Thanks to the spring growth spurt, the plant will bounce back quickly. Just remember to apply a good fertilizer once it warms up to give it the nutrients it needs to thrive.
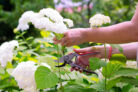
How to Deadhead Faded Blooms
Pruning isn’t just for the spring; “deadheading” (removing spent flowers) during the blooming season has some great perks. By snipping off faded blooms, the plant can stop wasting energy on old flowers and focus on healthy growth. It can even help extend the blooming period! Plus, it just keeps your garden looking tidy and fresh.
How to pinch off spent blooms:
- Grasp the faded flower stem just below the flower head with two fingers.
- Simply pinch or snip it off and pull it away.
- Leave the rest of the green stem on the plant.
Keep in mind that you should only use this “pinching” method during the summer months. Once fall hits, the rules change a bit to help the plant prep for winter—we’ll get into that in a moment.
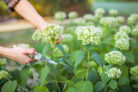
Cutting and Drying Hydrangea Flowers
One of the best things about hydrangeas is that they make stunning dried arrangements. You can bring a bit of your garden indoors to enjoy all winter long!
To do this, choose your most beautiful, full flower heads. You don’t need to do a major pruning job; just take a few choice stems. Use your shears to cut the stem about 8 inches below the flower head. Strip off all the leaves, leaving only the bloom.
Pro-tip for preserving the blooms:
1. Grab a vase and fill it with about 4 inches of soft (decalcified) water.
2. Place your hydrangea stems in the vase.
3. Leave them be! Don’t add any more water.
4. As the water evaporates, the flowers will dry out naturally and keep their shape.
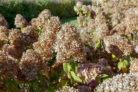
Fall Pruning and Care
In the fall, you can do some light thinning for Group 1 hydrangeas, while Group 2 is less fussy. However, there’s a big benefit to leaving the dried flower heads on the plant over the winter: they act as a natural insulation against frost. Those old stems protect the sensitive new buds lower down. You can always tidy them up in the spring.
Plus, there’s an aesthetic bonus! Dried hydrangea heads look beautiful covered in a dusting of snow, adding some lovely “winter interest” to your landscape while the rest of the garden is dormant.
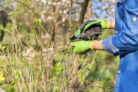
The “Rejuvenation” Cut
Young hydrangeas usually don’t need much work. But as a shrub gets older, it can start to look a bit “leggy” or messy in the middle. If the branches are splaying outward or tangling inward, it might be time for a rejuvenation cut.
How to refresh an overgrown hydrangea:
- Cut any completely dead or woody branches right down to the ground.
- For the healthy, “juicy” stems, leave them in place but trim them back by about a third.
- Always make your cuts just above a pair of healthy buds.
It’s best to do this deep pruning in early spring (January to March). If it’s a Group 2 variety, it will grow back into a lush bush in no time. If it’s a Group 1 variety, it will still recover beautifully, but just be prepared—you might have to skip the flowers for one season while the plant focuses on its comeback!