Raspberries have a bit of a reputation for being garden rebels. They love to send out super long canes that eventually flop over onto the ground, and their root systems? Well, they’re famous for sending out “suckers” (underground runners) that can quickly turn a tidy patch into a backyard takeover. If you don’t want raspberries popping up in the middle of your lawn or neighboring flower beds, a root barrier is definitely the way to go.
Why are raspberries so obsessed with spreading?
Raspberries are ultimate survivors. They reproduce via runners incredibly fast and reliably. While that’s great if you want a massive harvest, it can be a total headache for a gardener trying to keep things organized. These “cheeky fruits” will happily colonize your entire yard if you let them.
There’s a method to Mother Nature’s madness, though. By stretching out runners in every direction, the raspberry plant is constantly hunting for fresh pockets of nutrients and moisture.
Now, you might think, “I’ll just give them plenty of water and fertilizer so they stay put.” Unfortunately, it doesn’t work like that! Even a pampered plant won’t stop wandering. To keep them in check, you really only have three options:
- Choose a compact, dwarf variety.
- Grow your raspberries in large containers.
- Install a root barrier.
How to install a root barrier
First, head to your local hardware store or garden center. You’ll want to pick up one of these materials:
- Specialized rhizome barrier (HDPE plastic).
- Heavy-duty pond liner.
- Plastic panels.
- Pieces of sheet metal.
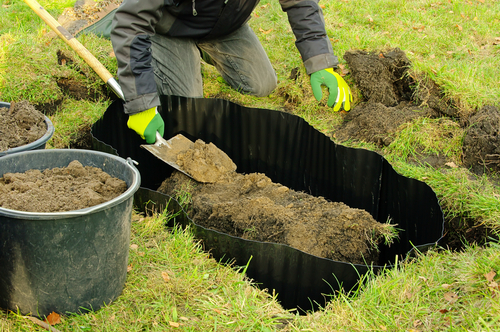
Even though raspberries are considered shallow-rooted plants, you still need to go deep enough to stop those runners. Aim for a depth of at least 16 inches (40 cm). Use a spade to dig a narrow trench all the way around your raspberry patch.
Slide your chosen barrier material into the trench. Once it’s in place, pack the soil back in tightly and use your garden hose to “mud it in,” ensuring there are no air pockets. Pro tip: Make sure to add a nice layer of mulch between the plants and the barrier. This helps regulate the soil temperature and keeps those roots from drying out too fast.
Should you install the barrier before or after planting?
Ideally, you’ll want to set up your root barrier before you ever put a plant in the ground—it’s much easier that way! But don’t worry if you’ve already planted your berries and realized they’re starting to stage a coup. You can still install a barrier later; you’ll just need to be diligent about digging up and cutting off any existing runners that have already escaped the “splash zone.”