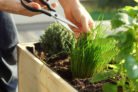
Let’s be honest: chive seeds can be a little stubborn. They take their sweet time to sprout, and if the conditions aren’t just right, they might not show up at all. To make sure your herb garden is a success, you need to know exactly what these little seeds crave. I’ve broken down everything you need to know to get those chives popping up in no time.
When do chive seeds actually germinate?
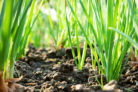
Chives are a bit unique compared to most kitchen herbs because they are “cold germinators” and dark germinators. This means they won’t sprout if it’s too hot out. In fact, they usually won’t germinate at all if temperatures climb above 65°F. They much prefer a chilly range between 35°F and 50°F. Plus, they need total darkness to wake up, so you’ll want to bury them about 1/2 to 3/4 of an inch deep in the soil.
One quick tip: not every chive variety produces viable seeds. Often, the best way to propagate chives is by dividing an existing clump. To save yourself the headache, I recommend buying high-quality, fertile seeds from a trusted garden center.
The best time to start your chives
For the best results, you’ll want to sow your chive seeds directly outdoors between mid-March and early April. I’d skip trying to start them on a sunny windowsill indoors—it’s usually way too warm in the house, and the seeds likely won’t sprout.
Picking the perfect spot for your seeds
While established chive plants are pretty hardy, the seeds are a bit more high-maintenance when it comes to their location. Here is what they’re looking for:
- Partial shade
- Loose, well-draining soil
- Consistent moisture
- Plenty of nutrients
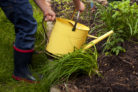
You’ll need to keep the soil damp, but be careful not to overwater. Standing water is a one-way ticket to root rot, which will ruin your crop before it even starts. It’s also a good idea to protect your planting area from heavy downpours. Once your chives are grown and strong, you can always transplant them to a sunnier spot in the garden.
How to sow chives like a pro
To give your chives the best start in life, you’ve got to prep the ground first. Here’s my go-to checklist:
- Give the planting area a good watering.
- Pull any weeds thoroughly.
- Dig over the soil carefully to loosen it up.
- Remove any rocks or old roots.
- Break up any large clumps of dirt.
- Smooth out the surface.
Once your bed is ready, it’s time to plant! If you want to grow chives in “clumps,” leave about 8 inches of space between them. If you prefer growing them in a neat row, space the seeds about half an inch apart, with at least 8 inches between each row.
Whatever you do, don’t just leave the seeds sitting on top of the dirt! Make sure to cover them back up with soil so they stay in the dark. If all goes well, you should see those first little green shoots poking through in about a month.