With a little bit of know-how, you can easily grow your own weeping willow right at home. You’ve actually got two main ways to go about it: you can start from seed or grow a new tree from a cutting. Here’s the lowdown on how both methods work and what you need to keep in mind to get the best results.
Propagation Methods for Weeping Willows
- Cuttings
- Seeds
Why Cuttings are Your Best Bet for Success
Dreaming of a majestic weeping willow in your backyard or maybe a smaller version for a specific spot? You’re in luck! Growing one is actually way easier than you might think, and it won’t cost you a dime. Most gardeners and pros prefer using cuttings because they have a much higher success rate.
All you need is a healthy, mature weeping willow to act as your “parent” tree. Just a quick heads-up: don’t go overboard when pruning for cuttings. Also, be mindful of local nesting seasons—you don’t want to disturb any birds making a home in those branches, and in some areas, heavy pruning during nesting season can actually get you in legal trouble!
Step-by-Step: Growing from Cuttings
- Pick a winter day that isn’t freezing to snip your shoots.
- Aim for cuttings that are about 14 inches (35 cm) long.
- Plant them directly into loose, moist soil in your garden or a suitable container.
- Give them a little “blanket” by covering the base with straw to keep the soil warm.
- Keep the soil consistently moist—willows love their water!
Growing from Seed: The Natural Way
If you want to kick it old school, you can try growing a willow the way nature intended: from seeds. Just a fair warning—willow seeds have a very short “shelf life” and lose their ability to sprout quickly, so your chances of success are a bit lower here. If you’re up for the challenge, here’s how to do it:
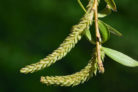
- Collect the seeds as soon as they are ripe and fluffy.
- Find a good spot and loosen up the soil.
- Plant several seeds in the same spot to increase your odds.
- Cover them lightly with soil and give them a good drink.
- Keep the area well-watered until you see those little sprouts popping up.