Potatoes are such fascinating plants. Did you know they don’t actually need soil or water to start sprouting? Everything a potato needs to get growing is already tucked away right inside the tuber. If you want to give your spuds a head start this season, here is everything you need to know about encouraging those first sprouts.
Choosing Your Seed Potatoes
Starting in early March, garden centers usually start stocking up on seed potatoes. There are so many varieties out there! I always encourage fellow gardeners to experiment with something new or stick with a tried-and-true favorite.
Here are a few of my top picks:
- Belle de Fontenay: A classic French tuber with incredible flavor. It’s considered a gourmet variety and holds its shape perfectly when boiled.
- Anuschka: A reliable German variety with smooth skin and great taste. It has beautiful yellow flesh and stays firm during cooking.
- Annabelle: This is a very early variety from the Netherlands. It’s firm to the bite, bright yellow, and—bonus—it even handles heavy clay soils quite well.
- Goldmarie: A high-yielding salad potato. It starts off growing a bit slow, so I definitely recommend pre-sprouting this one to give it a boost.
The Magic of Pre-Sprouting (Chitting)
Pre-sprouting your potatoes (often called “chitting”) is a fantastic way to get an earlier harvest . A potato that hasn’t been pre-sprouted usually takes about two to three weeks longer to mature in the garden.
You’ll want to start this process about four weeks before you plan on planting them outside . Mid-to-late March is usually the sweet spot, giving the tubers plenty of time to wake up. There are two easy ways to do this:
- Sprouting in a crate
- Sprouting in a pot
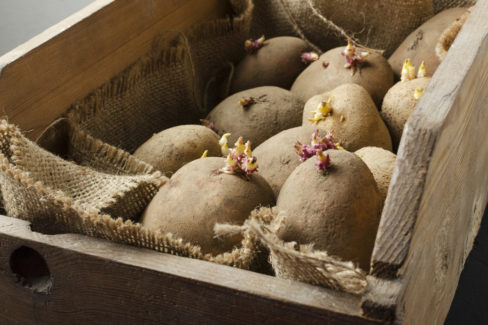
The Crate Method
Once you’ve got your seed potatoes, lay them out in a single layer in a shallow crate or box. Keep them in a bright spot at around 60°F (15°C).
If you look closely at your potatoes, you’ll see tiny dark bumps called “eyes.” This is where the sprouts will emerge, eventually turning into the green stems and flowers you see above ground.
One quick tip: avoid direct, scorching sunlight. It can dry out the tubers too fast and even “sunburn” those tender new shoots. Also, resist the urge to cut large seed potatoes in half at this stage; it can lead to rot or disease. It’s always best to sprout the whole potato!
The Pot Method
Sprouting in a pot has a huge advantage: the potato starts growing roots along with the sprouts. This gives the plant a massive head start once it hits the garden soil.
- Grab a small pot (about 4-6 inches). You just want the tuber to fit comfortably.
- Fill it with some potting soil or compost. Press the potato about an inch deep and cover it lightly with soil.
- Place the pot on a saucer in a bright spot (around 60°F) and keep the soil consistently moist.
- In about two to four weeks, you’ll have a little plant ready to go.
Planting Without Pre-Sprouting
If you’re short on time or space, don’t sweat it! You can put your potatoes straight into the garden bed starting in early to mid-April, even if they haven’t sprouted yet.
Just make sure the “eyes” are facing upward when you plant them so they know which way to grow. Bury them about two inches deep, and you can hill them up later.
Getting Them in the Ground
Once the spring weather turns warm and dry, it’s go-time. These plants originally come from warmer climates, so they really appreciate a soil temperature between 45-48°F (7-9°C).
Prepare your bed with plenty of compost or well-rotted manure. A bit of organic fertilizer , like horn meal, works wonders too. Loosen the soil deeply and create rows about 16 inches apart.
Carefully place your sprouted tubers into the rows, making sure those delicate sprouts are pointing up. Cover them gently with soil. Hilling the rows—piling soil up around the base—protects them from late frosts and prevents the potatoes from turning green.
I like to mound the soil about 4 inches high over the rows. Don’t worry if you cover the sprouts; they’ll find their way back to the light in no time! Plus, hilling prevents the sun from hitting the tubers, which stops toxic solanine from forming.
Pro Tip: For a healthier crop, try interplanting some marigolds. They’re great at warding off nematodes and look beautiful in the garden!