If you’ve been growing potatoes in your garden, the big question is always: when is the perfect time to dig them up? Getting the timing right is the secret to that homegrown flavor. Here’s my guide on how to harvest your potatoes, along with some pro tips to make sure your crop stays fresh.
Early Potatoes
Planting Basics
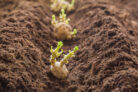
Once your seed potatoes have sprouted indoors (keep them around 60°F), you’re ready to get them in the ground as soon as the spring weather warms up in April. Your garden bed should be prepped ahead of time—either in the fall or early spring—with some well-rotted manure or compost.
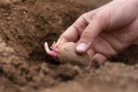
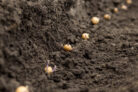
Wait until the soil temperature hits about 48°F before planting. Potatoes aren’t fans of cold, soggy soil! If the weather is cooperating, dig rows about 20 inches apart and tuck the tubers about 2 inches deep.
Keep an eye on the water; they need a steady drink but hate “wet feet” (standing water). During the growing season, give them a little boost with some organic fertilizer or compost tea .
When to Harvest
If Mother Nature is kind, you can start harvesting these beauties as early as late June. You’ll know they’re ready when the leaves start turning yellow and the skin doesn’t rub off easily when you give it a thumb-scrub.
Keep an eye out for late blight. If you see signs of this fungus, harvest those specific plants immediately. Blight can travel down into the tubers, causing sunken brown spots and ruining that delicious flavor.
A Few Varieties to Try
- Roter Erstling: Just like the name suggests, this is a very early variety. The tubers have a stunning bright red skin and taste fantastic.
- Casablanca: Originally from Scotland, this early, yellow-fleshed potato is super hardy. It’s a heavy producer and gives you nice, uniform shapes.
- Maris Peer: A bit more of a “diva” variety that needs consistent watering, but it’s worth it. It has creamy flesh, great flavor, and is fairly resistant to blight.
Mid-to-Late Season Potatoes
Planting Basics
These varieties take their time, needing about 150 to 170 days to mature. If you plant them in late April or early May, you’ll be harvesting in October. The best part? If stored correctly, they’ll last you until next spring! Just like the early types, make sure they’ve sprouted before moving them to a bed enriched with compost or manure.
Give them plenty of room—aim for rows 16–20 inches apart with 12–20 inches between plants. Plant them 2 inches deep and “hill” them (mound soil around the stems).
Summer care is all about water, feeding, and playing detective. Check often for potato beetles (pick them off by hand!) and consider a preventative horsetail tea spray to ward off fungus.
Don’t forget to keep hilling! If potatoes are exposed to the sun, they turn green and produce solanine, which is toxic. If you find green spots, make sure to cut them out generously before cooking.
Pro Tip: Regular hilling is also a great way to smother weeds before they take over. It saves you a ton of weeding time later!
When to Harvest
For late varieties, wait until the foliage has completely yellowed and dried up. This ensures the potatoes are fully mature and have developed a thick skin for storage. Stop watering and fertilizing about two weeks before you plan to dig them up.
Late September to early October is usually prime time. Try to pick a day when it’s under 60°F; if it’s too hot during harvest, the potatoes are more likely to rot in storage. And again, if blight shows up, don’t wait—get them out of the ground!
Late-Season Varieties
- Cara: These produce very large, uniform potatoes. They’re great for beginners because they handle drought quite well.
- Blaue Anneliese: These are showstoppers with blue skin and blue flesh! They have a rich, savory flavor and stay firm when cooked.
- Voran: A classic “floury” variety dating back to 1931. It’s very late-maturing and perfect for mashing.
The Harvest
If you’ve been hilling your potatoes , harvesting is a breeze because the soil in the mounds is nice and loose. If you planted in flat beds, you’ll need a bit more elbow grease. Use a garden fork rather than a shovel—it’s much less likely to slice your potatoes in half!
- Check that the foliage has died back.
- Gently pull the dead vines out of the ground; a few “pioneer” potatoes usually come up with them.
- Insert your fork into the soil about 8–12 inches away from the center of the plant to avoid stabbing the tubers.
- Lift the fork and give it a gentle shake. The soil will fall through, leaving the potatoes on top.
- Collect the tubers and then do one more “sweep” with the fork from the other side.
- Use your hands to sift through the loose soil for any hidden gems and place them in a basket or crate.
- Move your harvest to a cool, dark storage area.
Pro Tip: Aim for a dry day. The potatoes will come out clean without a bunch of mud sticking to them. If it is damp out, let the potatoes dry off in a cool room before packing them away, or they’ll rot.
Storage
With the right variety and timing, you can eat your own potatoes all winter. You need a frost-free, dark spot—think a cellar, a frost-proof garage, or even a cool pantry. The air shouldn’t be too dry. Some gardeners even store them in damp sand to keep them from shriveling.
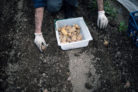
Before storing, sort through your haul. Only the “perfect” ones go into long-term storage; eat the bruised ones first! Use cardboard boxes or, even better, wooden crates.
Just don’t let them get *too* cold. If temperatures drop below 41°F, the starch turns into sugar, making the potatoes taste weirdly sweet. This is why the refrigerator is usually a no-go zone for potatoes.
Final Tip: Don’t wait too long to enjoy the fruits of your labor. There is nothing quite like an early potato served straight from the garden to the plate!