Native Americans in the South were growing potatoes over two thousand years ago! If you’re looking to add this delicious, versatile staple to your own backyard, you’ve come to the right place. Here’s everything you need to know to get a great harvest.
Chitting Your Potatoes
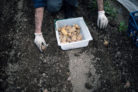
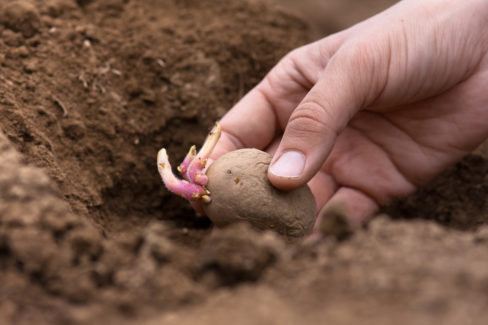
About four weeks before you plan to plant (usually around mid-March), you can start “chitting”—or pre-sprouting—your tubers. Just lay them out side-by-side in a box. Keep them indoors in a spot with light but no direct sun, and you’ll see sprouts starting to pop up. Pro tip: You can also place them directly into a pot with some soil. This doesn’t just encourage sprouts; it helps the potato start developing roots, which gives it a huge head start once it hits the garden bed.
Pre-sprouting leads to an earlier harvest. But don’t worry—if you don’t have the space or time for it, you can just follow our guide and plant them directly in the ground in April.
The Perfect Spot
To keep your potatoes happy, you need to give them the right environment. They love the sun! While they can handle partial shade, they won’t do well in full shade. As far as soil goes, they aren’t too picky. They thrive in humus-rich soil, but they’ll get along just fine in sandy or loamy dirt too.
Preparing the Bed
You’ve got two main windows to get your soil ready:
- Fall
- Spring
In the Fall
Dig over the bed or loosen the soil deeply and mix in some well-rotted manure or compost. If you cover the bed over the winter with leaves or semi-rotted compost, you’ll be rewarded with beautiful, crumbly soil come spring.
Planting a “green manure” cover crop also works wonders. You can find plenty of seed mixes at the garden center. August or September is the best time to sow these. Their roots loosen the soil, and the thick foliage prevents erosion. Plus, you can use the leftover plant matter as mulch in the spring!
In the Spring
If you’re starting in the spring, just focus on loosening the soil deeply with a hoe. Mix in some organic fertilizer like manure, compost, or horn meal, and you’re good to go.
When to Plant
These plants are originally from warmer climates, so they shouldn’t go into the ground until the soil temperature is at least 45°F (7°C). Cold, wet soil is bad news and can cause the tubers to rot. If the weather is sunny and dry in mid-April, you can start planting early varieties. Later varieties and “storage” potatoes should wait until late April or mid-May.
How to Plant
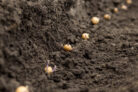
- Create rows in your prepared bed about 16–20 inches apart.
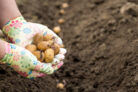
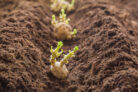
- Drop in a little compost and place the potatoes with the sprouts facing up.
- Carefully cover the tubers with soil.
- Now, “hill” them. This means mounding about 4 inches of extra soil over the rows.
- Lightly pat the soil down. No need to water them in right away.
- If you pre-sprouted yours in pots, just transplant them into the rows and hill them up as usual.
Tip: Hilling isn’t strictly mandatory, but it’s highly recommended. It prevents the potatoes from getting “green shoulders.” Those green spots happen when the tubers are exposed to light and contain solanine, which is toxic.
Care and Maintenance
Companion Planting
If you increase your row spacing to about 30 inches, you’ll have plenty of room for companion plants. Broad beans and various types of cabbage make excellent neighbors for potatoes. Want some color? Toss in some marigolds or calendula!
Weed Control
Early on, it’s important to keep weeds at bay. It’s best to pull them by hand carefully. I don’t recommend using a hoe near the plants, as you might accidentally nick the developing tubers. Once the potato plants get big enough, they’ll naturally shade out most of the weeds themselves.
Pests
If you spot Colorado potato beetles, the best move is to hand-pick the beetles and their larvae and dispose of them. It’s a bit tedious, but it’s much better than using pesticides in your home garden.
Try planting some peppermint around the edges of the bed—the beetles hate the smell, which can help keep them away.
Fungal Issues
In wet summers, late blight can be a real party pooper. To protect your plants, you can treat them early with a horsetail tea spray. Using it as a preventative measure can help stop or delay an outbreak.
Watering
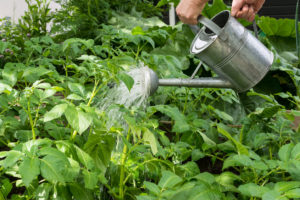
Potatoes do best when watered with rainwater
Potatoes appreciate a regular drink, especially during dry spells. Rainwater is perfect because it’s not too cold or “hard.” Try to water in the morning so the leaves have time to dry off, which helps prevent fungus. Just be careful not to overwater if the summer is already rainy—you don’t want them sitting in soggy soil.
A Quick Guide to Varieties
With about 4,000 varieties out there, choosing can be tough! Think about flavor, color, and how you like to cook them (waxy vs. starchy). Here’s a quick look at some favorites:
Heirloom Varieties
- Early Rose: An American variety from 1861. It’s a classic early potato with thin skin and a savory flavor.
- Eigenheimer: A Dutch favorite from 1893. It’s great for eating fresh and gets nice and floury when cooked.
- Odenwälder Blaue: A blue variety from Germany. It’s hardy, handles all soil types well, and is resistant to many viruses.
Early Varieties
Plant these in mid-to-late April, and you can start harvesting in about 110–130 days. The leaves will still be green at this point. You’ll know they’re ready if you can’t rub the skin off with your thumb. Only harvest what you need, though—early potatoes don’t store for very long.
A few to try:
- Solist: A waxy potato with a very short growing season. Great for containers!
- Rosara: Known for its red skin, high yield, and creamy texture.
- Sieglinde: The classic salad potato. It has firm, yellow flesh and an amazing flavor.
- Sarpo Una: A versatile red-skinned variety that works as both an early potato and a storage potato.
Late Varieties for Storage
Storage potatoes need to be fully mature, meaning the foliage should have died back completely before you dig them up. These usually take 130–150 days.
Check these out:
- Purple Rain: A stunning purple potato with marbled flesh. The color stays even after cooking, making it a showstopper in potato salads.
- Linda: Probably the most popular variety for a reason. It’s deep yellow, easy to peel, and stores incredibly well.
- Cheyenne: A high-yielding variety with an intense, fine flavor. It’s very reliable even in dry years.
Tip: The variety out there is huge! One of the best parts of home gardening is trying things you can’t find at the grocery store. I highly recommend “Pink Fir Apple” (Rosa Tannenzapfen)—it has a unique long shape and a wonderful nutty aroma.