There’s nothing quite like the taste of a potato freshly dug from your own garden. If you want to ditch the bland grocery store bags and start growing your own spuds, you’ve come to the right place! Here’s everything you need to know to get a great harvest.
Choosing Your Seeds
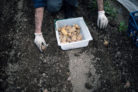
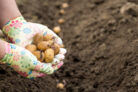
While there are hundreds of potato varieties out there, your local big-box store usually only carries a few. For the really cool stuff, check out specialty seed exchanges or online nurseries. You can usually start buying seed potatoes in early March. If you can, try chitting (pre-sprouting) them indoors first. Just pop the tubers in a box and keep them in a bright spot around 50-60°F.
In about three to four weeks, you’ll see nice, sturdy sprouts. Once mid-to-late April rolls around, it’s go-time for planting!
A Few Varieties to Try
- Dalida: A high-yielding, waxy variety with red skin. It’s pretty tough and handles dry spells well.
- Blaue St. Gallen: A delicious Swiss variety with purple/blue flesh. It has a creamy texture and a really intense, nutty flavor.
- Solara: A classic waxy potato that stores well. It gives you a great harvest of deep yellow spuds.
Setting the Stage for Growth
Find the Sun
Potatoes are sun-lovers! Whether you’re planting in a garden bed or a container, make sure they get plenty of light and warmth. Think of them as sun-soaked Mediterranean plants.
The Soil
Potatoes love compost. Rich, crumbly soil full of organic matter is the secret to big tubers. If you prepped your bed in the fall with rotted manure or compost, you’re golden—just loosen it up before planting.
If you planted a cover crop in late summer, even better! The roots loosen the soil, and you can use the greens as mulch in the spring. If you’re starting from scratch in the spring, mix in some compost or well-rotted manure. If you don’t have those handy, use organic fertilizer like blood meal or bone meal.
Planting Basics
Aim for about 20 inches (50 cm) between rows. If you leave a bit more space, you can sneak in some “companion plants” like fava beans or cabbage. Planting marigolds or calendula is also a pro move—they look pretty, strengthen your potatoes, and help keep pests away. Space your tubers about 12-20 inches apart in the row; smaller varieties can be a bit closer, while the big guys need more elbow room.
Getting Them in the Ground
- Wait until the soil temperature hits about 48°F (9°C).
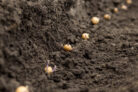
- Dig your rows and add a little compost.
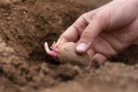
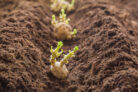
- Place your pre-sprouted potatoes in the row with the sprouts pointing up.
- Cover them up. They shouldn’t be deeper than about 2 inches (5 cm).
Timing is Everything
Early potatoes usually go in mid-to-late April, provided the weather is warm and dry. If you live at a higher elevation or spring is running late, just wait a bit. Later varieties can be planted through mid-to-late May. If you’re growing potatoes for winter storage, they’ll stay in the ground until the cool fall air arrives, giving them plenty of time to mature.
The Art of Hilling
Once your potatoes are planted, you can immediately mound some soil over the rows to create a ridge. This protects those sensitive young sprouts from late May frosts. Plus, the loose soil helps the plant breathe and grow better. If you keep adding fresh soil to the mound throughout the season, you’ll naturally smother weeds.
Hilling also makes harvesting a breeze—you just pull the mound apart rather than digging deep into packed earth. Note: If you have very sandy, light soil, hilling isn’t strictly necessary, but it’s a lifesaver if your soil is heavy or clay-based.
Growing in Containers
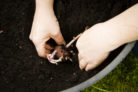
Don’t have a big backyard? No problem! Growing potatoes in pots works great. Use a container that’s at least 12 inches wide.
Pro Tip: Start with just 4 inches of soil at the bottom, plant your tuber, and keep adding soil as the plant grows until the pot is full. This encourages the stem to send out even more potatoes!
Maintenance
Watering and Feeding
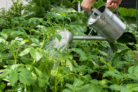
Potatoes like consistent moisture. It’s best to water between the rows so the moisture soaks straight down to the roots.
About four to six weeks after planting, it’s time for a snack. Potatoes are heavy feeders! Use an organic fertilizer or compost tea. Keep up the watering and feeding until about two or three weeks before harvest . At that point, dial back the water so the potatoes can “cure” and firm up.
Dealing with Weeds
You’ll see weeds popping up early on, but eventually, the potato plants will grow large enough to shade them out. Avoid using a hoe near the plants, as you might nick the growing potatoes. It’s better to pull weeds by hand. Regular hilling is also a great way to keep weeds under control.
Pests and Diseases
If you see Colorado Potato Beetles, the best fix is just picking them off by hand—make sure to grab the brown larvae and yellow eggs too! To prevent blight , try to water in the morning so the leaves dry quickly. A horsetail tea spray can also help boost the plant’s defenses. Since blight loves tomatoes too, keep these two crops far apart in your garden.
The Harvest
Potatoes fall into two camps: “New” (early) potatoes and storage (late) potatoes. For late varieties, wait until the foliage has completely died back. For early ones, you can harvest while the leaves are still green. A good test for ripeness? Try to rub the skin off a raw potato with your thumb—if it stays put, they’re ready!
Early potatoes don’t keep long, so eat them fresh! Only dig up what you need for dinner. Storage potatoes come out in the fall. Try to harvest them when it’s cool (50-60°F)—if it’s too hot out, they won’t last as long in the pantry.
Storage
Store your harvest in a cool, dark, and slightly humid place. A basement or a frost-free garage is perfect. Keep them pitch black! If they get any light, they’ll turn green and produce solanine, which is toxic.
Pro Tip: Want to try more flavors? Swap a few of your potatoes with gardening friends. It’s the best way to discover your new favorite variety!