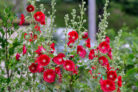
If you’re looking to add some serious height and charm to your garden, propagating hollyhocks is a total breeze! Growing these beauties from seed is super rewarding, and honestly, not that hard at all. You just need to know a few insider tricks to make sure those seeds actually sprout. Here’s my go-to guide on how to get your hollyhocks started.
Collecting and Prepping Your Seeds
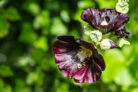
You’ve got options here: you can grab a packet of hollyhock seeds at the store, or if you (or a neighbor!) already have some in the garden, you can easily collect them once the flowers fade. To get them ready for their big debut, you need to mimic nature a bit. This means drying them out thoroughly and then keeping them in a cool, dark spot until you’re ready to plant.
Here’s your quick prep checklist:
- Dry them out
- Keep them cool
- Store them in the dark
One thing to remember: hollyhocks are “dark germinators.” This is just a fancy way of saying they need total darkness to wake up and start growing. Because of this, you can’t just sprinkle them on top of the soil and call it a day. If they’re sitting out in the light, they’ll either take forever to sprout or won’t grow at all.
How to Start Your Seedlings
You’ve basically got two ways to go about this. You can sow them directly in the garden, but if you do, you’ll want to give them a “cold treatment” (stratification) first and wait until the danger of frost has passed. Personally, I love starting them indoors where it’s warm, then moving them into a pot or right into the flower bed later on.
Grab some starter pots and fill them with a nutrient-rich soil—a good seed-starting mix works wonders. Tuck your seeds about half an inch (one centimeter) deep into the dirt. Give them a good drink, but don’t go overboard! Just like the grown-up plants, hollyhock seeds hate “wet feet” (standing water). Keeping the soil consistently moist but not soggy is the sweet spot.
If you follow these steps, you should see those cute little green shoots popping up in about 20 days. Once they’ve grown strong enough and the weather is right, you can move them to their perfect permanent spot in the sun!