Let’s be honest: moving is stressful. That’s true for us, and it’s definitely true for boxwoods! But while a little “moving day” anxiety is normal, you can actually manage that stress level quite a bit. With the right timing and a little prep work, your boxwood will settle into its new home and start thriving in no time.
The Best Time to Move Your Boxwood
If you can, aim for late March. Look for a day that’s frost-free, dry, but overcast—clouds are actually a gardener’s best friend during a transplant! Since the growing season is just about to kick off, the plant is primed to start establishing new roots immediately. By April, once the boxwood starts blooming, you’ve missed your window. If you have smaller shrubs, September is a great secondary option.
Prep Work Starts in the Fall
Since boxwoods are shallow-rooted, they need a little “training” before the big move. Ideally, you’ll want to start this process the previous fall. If you’re in a time crunch, try to give it at least two weeks of prep. Skipping this step is a recipe for trouble; without it, your boxwood will likely struggle to take up nutrients, leading to those dreaded yellow leaves after transplanting.
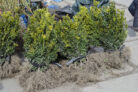
- Dig a circular trench around the base of the shrub.
- For older, larger plants, go about 24 inches (60 cm) deep.
- The diameter of your circle should be roughly twice the height of the plant.
- Fill that trench with mature compost.
- Keep the boxwood well-watered leading up to the move, but make sure the soil isn’t soggy.
This trick encourages the plant to grow a compact root ball full of tiny “feeder” roots, which will be its lifeline once it’s moved.
How to Transplant Your Boxwood
- Re-dig that trench, going a bit deeper this time. Angle your spade slightly inward toward the plant.
- Use a garden fork to gently loosen the soil around the roots.
- Lift the boxwood out and give the roots a good inspection. Use sharp, sterilized shears to snip off any damaged parts. Just remember: if you have to trim back a lot of roots, you’ll need to prune the top of the plant back proportionally so the roots can keep up.
- Place the root ball in a bucket of water and let it soak until it’s fully hydrated.
- While it’s soaking, head over to the new spot and dig a hole twice as wide as the root ball.
- Mix your soil with some mature compost. If your soil is heavy, adding a bit of sand can help with drainage.
- To prevent “wet feet,” consider adding a drainage layer at the bottom of the hole, especially if you have heavy clay soil.
- Set your boxwood in its new home, making sure not to cramp or crush the roots.
- Firm the soil down with your foot and give it a deep soak. Keep a close eye on the water for several weeks afterward!
Pro Tip:
If your boxwood is in a container, moving it to a new location is a breeze. However, even potted plants need a refresh. Plan on repotted your boxwood every 2 to 3 years with fresh soil and a slightly larger pot to keep it happy.