Sometimes, life happens and you find yourself needing to move a pear tree. Maybe you’re redesigning your backyard, or perhaps that “little” sapling you planted a few years ago is now taking over the patio. Pear trees—especially larger semi-dwarf and standard varieties—are often underestimated when it comes to their final size. If your tree is starting to crowd the neighbor’s fence or block a walkway, it might be time for a change of scenery.
However, moving a mature tree is a big job. Pear trees aren’t huge fans of being uprooted, but if you follow the right steps, you can give them a great shot at thriving in their new home. Here is my guide on how to transplant a pear tree the right way.
How to Move an Older Pear Tree: A Step-by-Step Guide
If you want to move a larger tree, patience is your best friend. You actually want to start this process a full year before the actual move!
- Start in the fall, one year ahead of time. You’ll want to prep the root ball first.
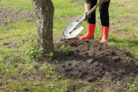
- Dig a trench around the trunk. If the trunk is about 8 inches (20 cm) around, make the circle about 32 inches (80 cm) wide. If the trunk is closer to 16 inches (40 cm) around, go for a 4-foot (120 cm) diameter. A good rule of thumb is to try and match the width of the tree’s canopy.
- Dig deep. The trench should be about two to three spade-lengths deep.
- Mix and refill. Mix the soil you dug out with some fresh compost and fill the trench back in.
- Wait for the magic to happen. Over the next year, the tree will grow a dense network of fine feeder roots within that loose, compost-rich soil in the trench.
- The big move. A year later, dig back down along the outer edge of that trench and carefully clear the soil away from those new fine roots.
- Prep the new home. Dig a new planting hole that is slightly larger than the root ball you just unearthed.
- Prep the soil. Loosen the dirt at the bottom of the new hole with a garden fork and toss in some compost. This makes it much easier for the roots to settle in.
- Transport with care. To move the tree, slide a large piece of burlap under the root ball and lift it into a wheelbarrow.
- Planting. Gently slide the root ball into the new hole and pull the burlap out from underneath.
- Support and fill. Drive two sturdy stakes into the ground on either side of the tree, then fill the hole back up with soil.
- Water and tamp. Step down on the soil to firm it up (but don’t pack it too hard!) and give it a very generous watering.
- Aftercare. Keep the tree moist—but not soggy—for the next few weeks. This is crucial for encouraging those new roots to take hold.
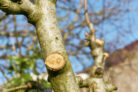
- Pruning. Trim back the branches a bit. This reduces the “sail” effect from the wind and helps the tree focus its energy on root growth rather than maintaining a huge canopy. Finally, secure the tree to your stakes with soft ties.
When is the Best Time to Move a Tree?
Timing is everything. You should always aim to move a tree during its dormant phase in the colder months. Late fall or early spring are your “Goldilocks” zones.
Technically, you *can* move a tree in the summer, but it’s a lot more work. You’d have to water it constantly and prune it back aggressively to prevent it from drying out through its leaves.
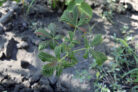
Pro Tip: If your tree is young (between one and four years old), it’s much easier to move. In that case, you can pretty much follow the same steps as planting a new pear tree.