Deciding to plant an apple tree in your backyard is a total no-brainer if you’re dreaming of a big harvest. Compared to a lot of other garden plants, fruit trees are actually pretty low-maintenance. Plus, they make for the perfect natural shade provider on those sunny summer days!
The Best Time to Plant
Generally speaking, fall is the absolute best time to plant fruit trees. When you plant in autumn, the tree starts growing new roots immediately, giving it a head start. You can get your apple tree in the ground starting in mid-October—just make sure to pick a day when the ground isn’t frozen. Technically, you can keep planting right through winter as long as the soil is workable. Pro tip: Try planting in the evening to keep those roots from drying out. If you bought a container-grown tree, you’re in luck—those can be planted year-round!
How to Get the Job Done
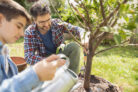
Planting a fruit tree is definitely easier with a buddy. It’s best to have one person hold the trunk straight while the other carefully fills in the hole with a mix of topsoil and compost.
- First, clear away the grass where you plan to dig. Set that top layer of fine soil aside in its own pile. You can use your shovel to mark out the hole—it needs to be twice as wide as the root ball and about one and a half times as deep.
- Loosen up the soil at the bottom of the hole and add a little soil-compost mix.
- Drive a support stake into the open hole before the tree goes in.
- If you have a lot of voles or gophers in your area, a root protection basket is a lifesaver. Use ungalvanized wire mesh so it eventually breaks down naturally after a few years.
- Place your tree in the hole. Make sure the graft union (that bump on the lower trunk) is at least a hand-width above the soil line. Keep in mind that the tree will settle a bit as the loose soil packs down.
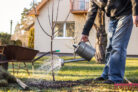
- While you’re filling the hole, give the tree a gentle shake and move it up and down slightly. This helps the fine soil settle deep into all the nooks and crannies of the root system. Once it’s filled, give it a good soak with water to settle everything.
- Lightly tamp the soil down with your feet, add a bit more soil if needed, and water again.
- Create a small “watering basin” (a ring of soil) around the trunk so the water sinks straight down to the roots instead of running off.
Quick Planting Tips
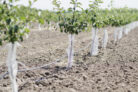
- Nurseries usually sell trees in three ways: burlap-wrapped, bare-root, or in containers.
- Burlapped and bare-root trees are best planted between late October and mid-November, or in March.
- Trees planted in the fall usually establish better. However, if you live somewhere with brutal winter freezes, spring planting might be the safer bet.
- If you have a bare-root tree, let the roots soak in a bucket of water for a few hours before planting, and trim off any damaged tips.
- Burlapped trees can go straight into the hole.
- Container trees can be planted anytime. Just make sure to gently loosen the root ball a bit before they go into the ground.
Post-Planting Aftercare
For the first few years, you’ll want to keep the area around the trunk clear of grass or weeds. You can cover this spot with mulch or a thin layer of grass clippings. Just don’t pile it right against the bark, as the heat from decomposition can actually damage the tree. A good mulch layer keeps the moisture in and stops weeds from taking over.
Under the Apple Tree
If you want a pop of color under your tree, try sowing some marigolds or nasturtiums. They look great and make the space feel like a real cottage garden!
Planting in Containers
Don’t have a big yard? No problem! Apple trees do great in pots or planters, making them perfect for a patio or balcony. Here’s how to do it right:
- Soak the root ball thoroughly in a bucket of water.
- Choose a pot that’s at least 20 inches (50cm) in diameter with drainage holes.
- Add a drainage layer at the bottom (like ceramic shards, pebbles, or gravel) to prevent soggy roots.
- Fill the pot with a high-quality potting soil—clay-based mixes work well here.
- Mix in some slow-release fertilizer according to the package directions.
- Keep the root ball soaking until no more air bubbles pop up, then let it drip dry for a second.
- Loosen the roots and set the tree in the pot, making sure the trunk is nice and straight.
- The tree should sit at the same depth it was in its nursery pot. Fill the gaps with your fertilized soil.
- Press the soil down firmly with your fingers, give it a good drink of water, and you’re all set!