Since boxwoods are notoriously slow growers, every inch of height usually comes with a higher price tag. When you’re at the garden center, you’re faced with a choice: buy tiny “starter” plants or dig deep into your pockets for established ones. But if you’ve got a little patience, you can easily propagate these evergreen beauties right at home.
Growing Boxwood from Seed
Yes, you can grow boxwood (scientific name *Buxus*) from seed, but it’s definitely the “slow road.” You can only harvest seeds from older plants, and they can take up to six months just to germinate. This method is really for the experimental gardeners who aren’t in a rush. However, there is one big perk: seed-grown plants develop deeper taproots, which makes them much more resilient during dry spells later on.
Dividing Larger Plants
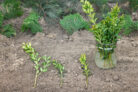
If you have a boxwood that’s over ten years old with a nice, bushy root system, you can propagate it by division. The best time to do this is in early spring or during the late summer (September).
- Use a spade to dig up the root ball.
- Aim for a radius roughly equal to the height of the plant.
- Lift the boxwood out with a garden fork and place it on a sturdy surface.
- Clean and disinfect a saw or a sharp spade.
- Cut the rootstock into sections.
- Make sure each section has at least two or three healthy shoots.
- Replant them in a spot with partial to full shade.
Pro Tip:
Your new divisions will have a much better chance of thriving if you pot them up first in some lime-rich soil. Once the root system looks strong and established, you can move them to their permanent home in the garden.
How to Take the Best Cuttings
While you can technically take standard cuttings, “heel cuttings” (torn rather than cut) tend to root much better. The sweet spot for doing this is mid-summer, around July or August, using a strong, healthy mother plant. That said, you can technically try propagating boxwood from cuttings almost any time of year.
- Choose a vigorous branch with plenty of side shoots. These shoots should be at least two years old; if they’re too young and soft, they’ll likely rot before they root. Aim for a length of at least 4 inches, though 8–12 inches is even better to help make up for that slow growth rate.
- Instead of cutting, pull the side shoots off with a quick downward tug. You want a small “heel” or strip of bark from the main stem to remain attached.
- Trim any long, ragged “tails” of bark with shears.
- Strip all the leaves off the bottom third of each cutting.
- Dip the ends in a rooting hormone to give them a head start.
- Snip off the very tips of the shoots by about a third.
Rooting Your Cuttings
If your cuttings are on the larger side and you took them during that mid-summer window, you can actually root them directly in a garden bed.
- Loosen the soil well and mix in some compost.
- Stick the cuttings about one-third of their length deep into the ground.
- Water the bed well, then keep the soil consistently moist (but not soggy).
- Cover them with brushwood or evergreen boughs in the fall for protection.
- This is especially important in sunny or windy spots.
- Wait until spring to transplant them to their final location.
Pro Tip:
Be careful not to overwater! Standing water is a recipe for rot. Also, make sure the remaining leaves aren’t touching the soil—this helps prevent fungal infections from moving in.
Using a Mini-Greenhouse for Tricky Conditions
If you only have very short cuttings or you’re starting them outside of the summer window, a mini-greenhouse is your best bet. Use a high-quality seed-starting mix. In the summer, keep the greenhouse in a shady spot outdoors; in the winter, move it to a frost-free spot inside. Just like the outdoor cuttings, wait until spring to plant these youngsters out in the garden.