Every spring, we look forward to those gorgeous tulips popping up, but have you noticed they tend to disappear after a few years if you don’t dig them up? Even bulbs that survive the summer eventually lose their steam. When that happens, you’ve got two choices: head to the garden center for new ones, or try your hand at propagating them yourself!
How to Propagate Tulips
There are actually two ways to get more tulips: using “bulblets” (offset bulbs) or starting them from scratch with seeds.
Using Bulblets (Offsets)
Propagating tulips via daughter bulbs is what we call “vegetative reproduction.” While the tulip is blooming, tiny little bulblets are actually growing from the layers of the main bulb. By the time the flowers fade, these little guys are usually big enough to be planted on their own. Once the foliage has completely withered away, it’s harvest time:
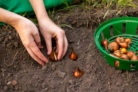
- Use a garden fork to gently loosen the soil around the bulbs.
- Dig them up deeply with a small trowel.
- Try your best not to damage the roots.
- Brush off any loose dirt.
- Use a sharp, sterilized knife to carefully detach the bulblets.
Cutting these little bulbs away leaves a small “wound” on both the mother and the baby. To keep germs out, it’s a great idea to dust those spots with some charcoal powder. After that, the mother bulb gets stored away to dry out over the summer, while the tiny bulblets should go right back into the ground in a good spot. Make sure the soil is loose, well-draining, and full of nutrients.
By next spring, you’ll see a leaf or two popping up from those small bulbs. Don’t cut them back until they turn yellow in the fall—that’s how the bulb soaks up all the energy it needs. If you’re lucky, you might even see your first blooms the following year!
Growing from Seeds
Usually, we snip off spent tulip stems to keep the plant from wasting energy on seeds. But if you want to try “generative propagation” (growing from seed), you’ll need to leave those wilted flowers alone so the seed pods can develop. This takes about two months. Keep a close eye on them—you want to harvest the seeds just as the pods start to dry out but before they burst open. Here’s the game plan:
- Cut the seed pods off just before they crack open.
- Rub the pods to release the seeds and sift them out.
- Let the seeds dry for a bit longer.
- Prepare a container with a mix of 3 parts garden soil to 1 part seed-starting mix.
- Scatter the seeds on top.
- Cover them with a thin layer of sand.
- Give them a gentle misting with water.
- Add a layer of fine gravel over the sand so the wind doesn’t blow it away.
- Place the pot in a semi-shaded spot in your garden.
- Water occasionally; you don’t want the soil to bone dry.
Next spring, you’ll see thin, grass-like sprouts. Eventually, these will wither, but don’t worry—tiny little bulbs have formed at the base! Harvest these carefully and give each one its own small pot with starter soil. Keep them in a protected spot outside. Just a heads-up: this method requires some serious patience. It can take five years or more before you see your first flower!