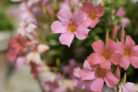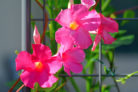
Most people treat Dipladenia (also known as Mandevilla) as a one-and-done annual. But here’s a pro tip: if you bring her indoors for the winter, you can enjoy those stunning blooms for years! To keep your Mandevilla thriving long-term, though, you’ve got to give her some fresh space every now and then. Here is everything you need to know about repotting.
Why bother repotting?
The main reason to repot your Mandevilla is to give it a fresh start with high-quality soil. These plants are heavy hitters—growing those long vines and bright flowers takes a ton of energy. Over time, they suck all the nutrients out of the soil. Eventually, the potting mix gets “spent,” and even regular fertilizing won’t be enough to fix it.
Another obvious sign is when your perennial Mandevilla simply outgrows its home. You’ll know it’s time when:
- Roots start poking out of the drainage holes.
- The soil surface starts lifting up because the roots are pushing it out.
When and how often?
Generally, you should aim to repot your Mandevilla every two to three years. The sweet spot for this is early spring, right before the new growth starts kicking in. This gives the plant a chance to settle its roots into the new soil so it’s fully locked and loaded for the upcoming blooming season.
How to do it right
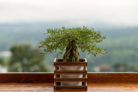
Choosing the right pot is key. You want something slightly larger than the current one, and it *must* have drainage holes. Be careful not to go too big, though! If the pot is massive, the Mandevilla will spend all its energy growing roots to fill the space instead of giving you those gorgeous flowers.
If you want to keep the same decorative pot or you’re working with a planter that has a built-in trellis, you can actually prune the root ball slightly. This allows you to refresh the soil while keeping the plant in its original (thoroughly cleaned!) container.
Step-by-Step Guide
If you’re refreshing an established Mandevilla, stick with the potting mix it’s already used to. For new plants or routine upgrades, here’s the game plan:
- Gently slide the Dipladenia out of its old pot.
- Use your fingers to carefully loosen the root ball.
- Shake off any excess, exhausted soil.
- Trim away any old, mushy, or dried-out roots.
- Create a drainage layer at the bottom of the new pot using terracotta shards or gravel.
- Add a thick layer of high-quality potting mix (specifically for container plants).
- Set your Dipladenia in the center.
- Fill in the gaps with more soil.
- Press the soil down lightly to remove air pockets.
- If your plant needs support, tuck in your trellis now.
- Give it a good drink of water.