There are a few different ways to propagate hyssop, but you’ll find that most gardeners skip things like division or cuttings. Why? Because hyssop seeds are super easy to find and they sprout like a dream! Whether you want to get a head start indoors or just scatter them directly in your garden beds, you’re in for an easy win.
Direct Sowing Starts in May
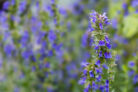
While established hyssop (*Hyssopus officinalis*) is totally winter hardy, the seeds themselves are little warmth-seekers. That’s why we usually wait until May to sow them outdoors, once the threat of frost has finally passed. Since hyssop grows quickly and lives for several years, starting a little later in the spring won’t hold you back from using your harvest later in the season.
- Direct sowing is safe starting in May.
- Pick a spot with plenty of bright sunlight.
- Loosen the soil well and break up any large clumps until it’s nice and crumbly.
- Clear out any weeds or old root debris.
- Scatter your seeds evenly.
- Press them gently into the soil, but do not cover them. Hyssop seeds need light to germinate!
- Mist the soil carefully and keep it consistently (but moderately) moist.
Pro Tip:
Already have a hyssop plant in your garden and want more? Don’t be too quick to prune off all the spent flowers. This herb is a champion at self-seeding. Just keep an eye out in the spring for “volunteer” seedlings popping up nearby—you can easily dig them up and move them wherever you like!
Starting Hyssop Indoors
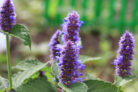
If you’re eager to get your hyssop garden (also known as “Blue Hyssop” or a favorite for bees) going, you can start seeds indoors. The whole point of indoor starting is to give your plants a head start, so aim for March or April.
- Sow seeds on top of a high-quality seed-starting mix.
- Just press them in lightly; remember, they need light to sprout.
- Place them on a bright windowsill or in a greenhouse.
- Keep the soil consistently moist.
- The “sweet spot” for germination temperature is between 60°F and 70°F (15–20°C).
Under ideal conditions, you should see those little green sprouts appearing in about two to three weeks.
Thinning and Transplanting
Once mid-May rolls around, your indoor babies are ready to move outside. If they started growing like crazy early on, you might need to “prick them out” into individual pots before the big move. If you sowed directly in the garden, you’ll also need to thin them out once they’ve grown a few pairs of true leaves. Here’s the game plan for all young plants:
- Choose a sunny, bright location.
- Use well-draining, slightly alkaline (limy) soil.
- They do great in herb gardens, veggie beds, or containers.
- If you have an herb spiral, put hyssop right at the top in the dry zone.
- Hyssop loves dry feet—it handles drought well but hates soggy soil.
- Space your plants about 10 inches (25 cm) apart.
Keep your young plants regularly watered right after planting. Once they’re established, you’ll only need to water them during really intense dry spells. Also, if your first winter with the plant is particularly brutal, it’s a good idea to give your young hyssop a little extra mulch or protection!