Maple trees are masters of reproduction, sending out a massive wave of seeds every fall to scout out new territory. These seeds have a super distinct shape that almost everyone recognizes—honestly, they’re just as fascinating to us humans as they are useful to the tree! Here is a quick breakdown of how they work.
What Maple Seeds Look Like and When They Ripen
Maple trees start showing off their blossoms as early as April. While you can actually tell different maple species apart by their flowers, the process of seed development is pretty much the same across the board. The tree takes its time all summer long to get those seeds ready. Here’s what you’ll see:
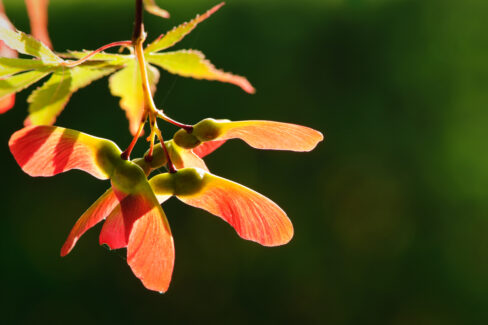
- Each fruit is actually a “double samara”—two winged nutlets joined together.
- Depending on the species, those wings might sit horizontally or form a V-shape.
- You probably know them as “helicopters” or “whirlybirds,” and kids love pinning them on their noses!
- By autumn, the seeds are fully ripe.
- The fruit eventually splits into two halves, each with its own wing.
- Thanks to that wing design, the wind can carry them surprisingly far from the parent tree.
Quick Tip:
If you have horses or donkeys, keep a close eye on your pastures. Seeds from Sycamore Maples and Box Elders are actually toxic to them. You can find more details in our Maple Tree Profile.
Maple Seeds Need a “Cold Snap” to Wake Up
When a maple seed hits bare soil, it’s taken the first step toward becoming a giant tree. But it can’t just sprout right away. If it germinated in the fall, the tiny seedling wouldn’t survive the winter. To prevent this, maple seeds have a built-in “sleep” mode. They need to experience several weeks of cold temperatures—a process called stratification—before they realize it’s safe to sprout during a warm spell.
How to Grow Maples from Seed at Home
If you manage to catch a few of those “helicopters” and give them the cold treatment they crave, you can actually grow your own maple trees. It’s a fun project, though it does require some patience! You have two main options: plant them directly in the garden in the fall, or start them indoors in the spring. If you go the indoor route, you’ll need to mimic winter by placing the seeds in a bag of damp sand in your refrigerator’s crisper drawer for three to four months. When you’re ready to plant, follow these steps:
- Aim to sow your seeds between March and April.
- Consider treating the seeds with a growth hormone (like gibberellic acid) to boost success.
- Use individual starter pots filled with high-quality seed-starting mix.
- Pro tip: You can sterilize your soil in the oven beforehand to kill off any pathogens.
- Moisten the soil with lukewarm water.
- Press the seeds about half an inch (1 cm) deep into the soil.
- Place them in a warm spot with partial shade.
- Keep the soil consistently moist, but not soggy.
- Keep the young saplings indoors for their first winter to protect them.
A Quick Note:
Keep in mind that seeds from specialized ornamental cultivars won’t grow into a “clone” of the parent tree. If you want a tree with specific characteristics from a hybrid, you’ll need to propagate it via cuttings or layering instead.