Daylilies are some of the easiest plants to care for, and they’ll reward you with absolutely stunning flowers. While they aren’t high-maintenance, there are a few tips and tricks to keep in mind when you’re getting them in the ground. Here’s everything you need to know to get started!
When to Plant
The best time to plant daylilies is either in the spring (starting in April) or the fall (starting in October). Just make sure you pick a day when there’s no frost in the forecast—if you’re planting in the spring, waiting until after the last frost is usually your safest bet. The best part? You can usually expect a gorgeous bloom in the very same year! Oh, and here’s a fun fact: every part of the daylily plant is actually edible.
Location, Soil, and Spacing
Daylilies are pretty flexible when it comes to their location—they’re happy in full sun or partial shade. However, keep in mind that more sunlight generally means more flowers. You’ll also want to give them some elbow room; depending on the variety, try to space them about 20 to 35 inches apart from other plants.
When it comes to the type of soil mix, it’s hard to go wrong. Whether it’s alkaline, lime-heavy, acidic, or dry, daylilies are hardy enough to thrive almost anywhere. That said, they do have a few preferences for the ground they’re sitting in. For the best results, look for soil that is:
- Nice and loose.
- Rich in organic matter (humus).
- Well-draining.
- (Don’t worry too much about high nutrient density; they aren’t super picky!)
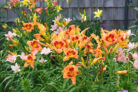
As for neighbors, daylilies are very friendly. They get along with almost any plant that shares similar soil and light needs. If you’re looking to make your garden a real showstopper, try mixing and matching different flower colors for a beautiful visual pop.
How to Plant Daylilies: A Step-by-Step Guide
- Start by digging a hole about 12 inches deep.
- Loosen up the soil around the edges of the hole so the roots can breathe.
- Create a small mound of soil right in the center of the hole.
- Place the root clump on top of the mound, spreading the roots out evenly in all directions.
- Fill the hole back in with soil and press down firmly to settle it.
- Make sure the crown (where the roots meet the stem) is about an inch below the surface.
- Give your new plant a good soak of water and add a layer of mulch to finish it off.