Hydrangeas have a magical way of transforming any garden with their stunning, long-lasting blooms. But to get those iconic flower heads to pop, you’ve got to start with the right spot and the right care. If you’re ready to add some “wow” factor to your yard, follow these tips to give your hydrangeas the best possible start.
Choosing the Perfect Spot
The best time to get your hydrangeas in the ground is between March and July. Planting during this window gives the roots plenty of time to establish themselves during the warm months before the winter chill sets in. Before you start digging, take a second to really scout out the location. Ideally, you want to pick a “forever home” for your hydrangea—these plants aren’t big fans of being moved once they’ve settled in.
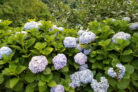
Most hydrangeas love shady or semi-shaded spots. While there are a few varieties that can handle the heat, most are pretty sensitive to direct, harsh sunlight. Because of their big leaves, they lose moisture fast and can actually get sunburned! You’ll also want to pick a spot protected from the wind. Otherwise, those heavy flower heads might snap the stems during blooming season. Beyond the sun and wind, the soil (or substrate) is the next big piece of the puzzle.
The Dirt on Soil
Unlike many other garden favorites, hydrangeas prefer acidic soil. Since most backyard soil isn’t naturally acidic, you’ll likely need to give yours a little boost. You’re looking for a mix that is both acidic and well-draining. This ensures that when you water your thirsty plant, the excess can flow away instead of sitting around the roots.
Great soil options for hydrangeas include:
- Specialized hydrangea potting mix
- Well-draining forest soil with coarse fibers
- Rhododendron soil
- Azalea mix
If you’re worried your garden soil is too heavy, don’t sweat it—just add a drainage layer before planting. Tossing some gravel or similar material into the bottom of the hole prevents waterlogging, which can lead to root rot. One big pro-tip: avoid lime-heavy soils. Lime neutralizes acidity, which can really mess with your hydrangea’s growth and flower production.
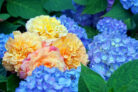
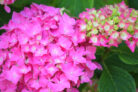
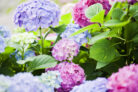
pH Levels and Flower Color
Did you know the pH value of your soil actually dictates the color of the blooms? If the chemistry isn’t right, those vibrant colors can fade. On the flip side, you can actually change the color of your flowers by tweaking the soil. Just keep in mind that it takes about two years for a color shift to fully take effect, so it’s best to plan this out when you first plant. You can check your soil’s pH using simple test strips from any garden center, or by starting with a specific potting soil.
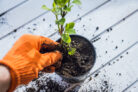
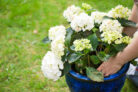
Digging the Hole
Whether you’re planting in the ground or using a large container, space is key. Your hole (or pot) should be about twice as wide as the hydrangea’s root ball. If you’re growing in containers, plan on moving your plant to a larger pot every two to four years. Try to dig the hole right when you’re ready to plant so the roots don’t dry out while waiting.
Loosen up the soil at the bottom of the hole to help the roots spread out easily. You want them to have plenty of room to breathe—no cramping allowed! Make sure your soil mix is the kind that holds moisture well without getting swampy.
Hydrangeas are thirsty—their botanical name, *Hydrangea*, actually comes from the Greek word for “water vessel.” To keep those big blooms looking fresh, they need a steady supply of water. Use soft water (low in lime) or rainwater if possible, and try to avoid watering in the heat of the midday sun. Always aim for the base of the plant rather than getting the leaves wet.
How to Plant Your Hydrangea
Spacing is everything. Make sure your hydrangea has plenty of “personal space” from other plants. While they do okay under deep-rooted trees, planting them too close to other shrubs can lead to a fight over water and nutrients. Aim for a planting distance of about 30 to 60 inches (80 cm to 1.5 m) from neighbors.
Step-by-Step Planting:
1. Give the root ball a quick soak in a bucket of water.
2. Place the hydrangea in the center of your hole.
3. Make sure it’s not sitting too deep—keep the top of the root ball level with the ground.
4. Fill the hole with your acidic soil mix.
5. Give it a good drink with rainwater or filtered water.
For the first two weeks, keep a close eye on the water. New plants need extra hydration while they’re getting established. You can add a little leaf compost now, but hold off on the heavy fertilizer until next spring. If you used a good hydrangea-specific soil, it already has all the nutrients your plant needs for the first season.
Mulching and Aftercare
I highly recommend mulching your hydrangeas. Spreading a layer of bark mulch or similar material around the base is a total game-changer. First, clear out any weeds, then spread a layer about 2 to 3 inches thick. This does three great things: it protects the roots from frost (especially important for young plants that aren’t fully winter-hardy yet), it holds in moisture, and it stops weeds from moving in—saving you a ton of work!
Great mulching materials include:
- Bark mulch
- Grass clippings
- Shredded leaves
As an added bonus, bark mulch naturally acidifies the soil as it breaks down, creating the exact environment hydrangeas love. Happy gardening!