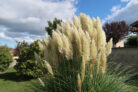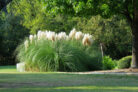
When it comes to propagating pampas grass, my best advice is to go with root division whenever possible. Dividing the clump doesn’t just give you a new plant; it actually rejuvenates the original one, making it healthier in the long run. Plus, it’s way less work! But, if you’re looking for a fun gardening challenge, you can definitely try growing it from seed.
Direct Sow or Start Indoors?
The first thing most people ask is whether they should start seeds directly in the garden or in pots first. Honestly, starting them in pots is the way to go. Not only do birds love to snack on the seeds if they’re left outside, but young pampas grass is also super sensitive to frost during the germination phase. By starting indoors in March, you give your plants a much-needed head start.
Pampas Grass Needs Light to Grow
Pampas grass seeds are “light germinators,” meaning they need sunlight to wake up. Here’s the best way to get them started:
- Fill some small starter pots with a high-quality seed-starting mix.
- Sow the seeds on top and press them down very lightly.
- Use a spray bottle to keep the soil moist—don’t pour water directly on them, or you’ll wash the seeds away.
- Cover the pots with plastic wrap to create a little greenhouse effect.
The most important rule? Do not bury the seeds under the soil. If they don’t get light, they won’t sprout.
Setting Up Your Growing Station
Find a bright spot for your pots, but try to avoid harsh, direct midday sun. Since pampas grass is native to South America, it loves warmth. Keeping your room temperature between 68°F and 72°F (20-22°C) is perfect. While mature pampas grass is famous for being drought-tolerant, these little seeds need to be watered regularly to stay moist.
You should see sprouts appearing in about two weeks. Once the threat of frost has passed in late May, your new babies are ready to be moved to their permanent home in the garden!