In the wild, violets are pretty self-sufficient when it comes to spreading their wings. They usually expand through runners or by dropping seeds. Interestingly, ants actually do a lot of the heavy lifting! They carry the ripe seed pods back to their nests, eat the tasty outer part, and leave the seeds behind to sprout. It’s nature’s way of making sure these little beauties pop up all over the place.
But if you want to take charge and grow them exactly where you want them in your garden, you’ve got a couple of great options.
Growing from Seed
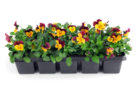
You can grab a packet of Viola seeds at your local garden center or just harvest them from your own plants.
The best time to sow is anytime between August and March. Just keep in mind that violets are “cold germinators” and “light germinators.”
“Cold germinator” is just a fancy way of saying the seeds need a chilly period to wake up. If you plant them directly outside starting in August, winter will naturally take care of that for you. However, if you’re starting them indoors, you’ll need to “stratify” them. Just pop the seeds in a plastic bag with a little damp sand and keep them in the fridge for a few weeks. After that, here’s the game plan:
- Fill a seed tray with a low-nutrient seed-starting mix.
- Scatter the seeds thinly and press them down firmly into the soil.
- Don’t bury them! Since they are light germinators, they need exposure to light to sprout, so leave them on the surface or cover with just a tiny dusting of soil.
- Keep the tray in a relatively cool spot and make sure the soil stays moist.
- Once you see those first sprouts popping up, move the tray to a warmer location.
- As soon as your seedlings have two or three true leaves, they’re ready to be thinned out and transplanted into the garden.
Propagation by Division
If you don’t want to mess with seeds, dividing older plants is a super easy shortcut. The best time to do this is in the spring after they’ve finished blooming, or in the fall.
Start by carefully digging up the violet, root ball and all. Shake off the loose dirt so you can see what you’re working with. You can use a garden knife or shears to cut the root ball apart, but if the roots aren’t too tangled, I like to just pull them apart by hand—it’s gentler on the plant. Just make sure every piece you pull away has at least one healthy shoot or bud attached.
Now, just tuck your new violets into the right spot—ideally somewhere with partial shade and moist soil. Give them about 8 inches of breathing room between each plant, and you’re good to go!