Horned violets (Viola cornuta) are those amazing spring flowers that just keep on giving, often blooming straight through until fall. If you’re looking for a low-maintenance garden, these little guys are great because they love to self-seed and pop up on their own year after year. But if you want to get a head start or fill a specific spot in your yard, you’ll want to know the best time to get them in the ground.
The Best Time to Plant Horned Violets
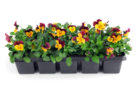
Most of us can’t resist those colorful pots of pre-grown violets at the garden center in early spring. Just a heads-up: those greenhouse-raised plants aren’t usually “hardened off” (toughened up for the outdoors). To be safe, wait until mid-May to plant them outside—ideally after the last frost has passed—so a sudden cold snap doesn’t zap them.
Growing Horned Violets from Seed
You’ve got two main options here: sowing them directly in your garden or starting them indoors. If you sow seeds outside between April and June, you’ll see blooms by the following summer. However, if you get them in the ground between August and March, they’ll be ready to show off their colors by the very next spring.
Here’s a pro tip: mix your seeds with a little bit of sand and give them a good rub. This scuffs up the hard outer shell and helps them sprout much faster. When you’re ready, scatter the seeds over your soil, press them down firmly, but only cover them with a tiny dusting of dirt. These seeds are “light germinators,” meaning they need sunshine to wake up! Keep the area nice and moist, and in about four weeks, you’ll see those tiny green sprouts appearing. If they’re looking a bit crowded, just thin them out and move the extras to a new spot.
Starting Seeds Indoors
If you want a head start on the season, you can start your seeds in trays on a sunny windowsill or in a sunroom as early as February. They like a cool room temperature—somewhere between 59°F and 65°F (15-18°C) is perfect. Here’s the step-by-step:
- Fill your seed tray with a good quality seed-starting mix.
- Rub the seeds with a bit of sand to “scarify” (scratch) the shell for easier sprouting.
- Scatter the seeds, making sure they aren’t too crowded.
- Press them down and cover with just a whisper of soil—remember, they need light!
- Give them a good misting with water.
- Keep the tray in a dark spot for about ten days (just make sure the soil stays damp).
- Total germination takes about four weeks.
- Once you see those first little leaves, move the tray to a bright, sunny spot.
- You can transplant your babies into the garden anytime between March and October!